Tuto installation Klipper from scratch using KIAUH
Klipper installation from scratch using KIAUH Tuto
Hello makers !
This time, on nozzler, I will teach you how to install Klipper on a printer with custom electronics, from scratch and using and helper script called KIAUH.
⇒ Reference : https://github.com/dw-0/kiauh
Before we start, I have to warn you that this tutorial required some solid knowledges on
→ Linux and how to use SSH console
→ Be familiar with certain programming concept
→ Be familiar with certain network concept
→ Be familiar with 3D printer electronic like motherboard, stepper, motor drivers, etc etc
With that in mind, let’s get to the heart of the matter.
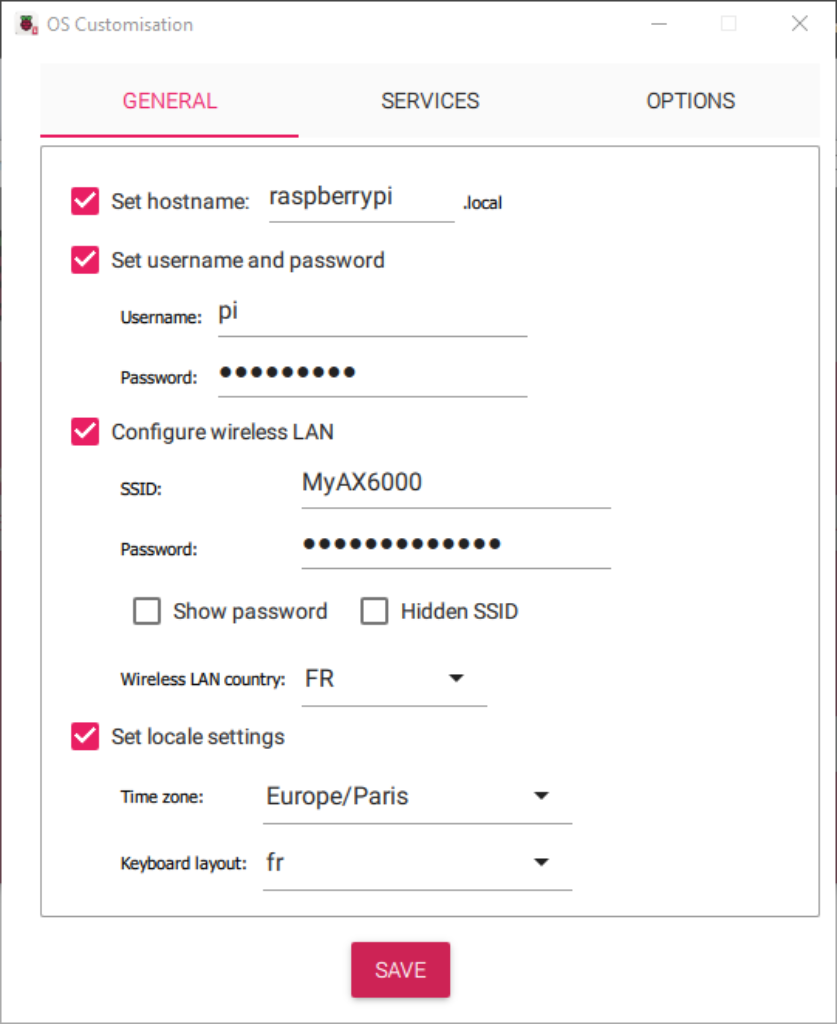
On a windows machine :
→ Download and install Raspberry pi imager
→ Install 32 bits lite version of Raspberry pi OS (64 bits may cause some bugs)
→ Configure parameters as follow

Launch install and wait until it’s finished.
Eject SD Card and install inside raspberry pi
Power your raspberry and wait a moment until it has finished to boot.
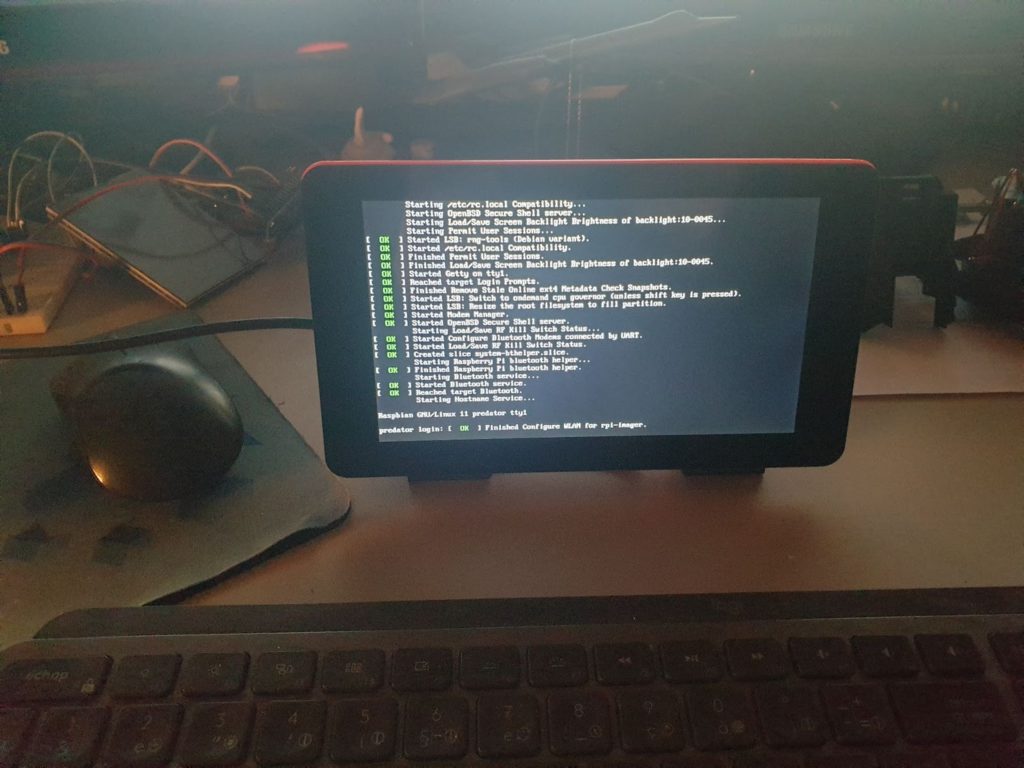
Find its IP and connect to it with an SSH client like MobaXTerm
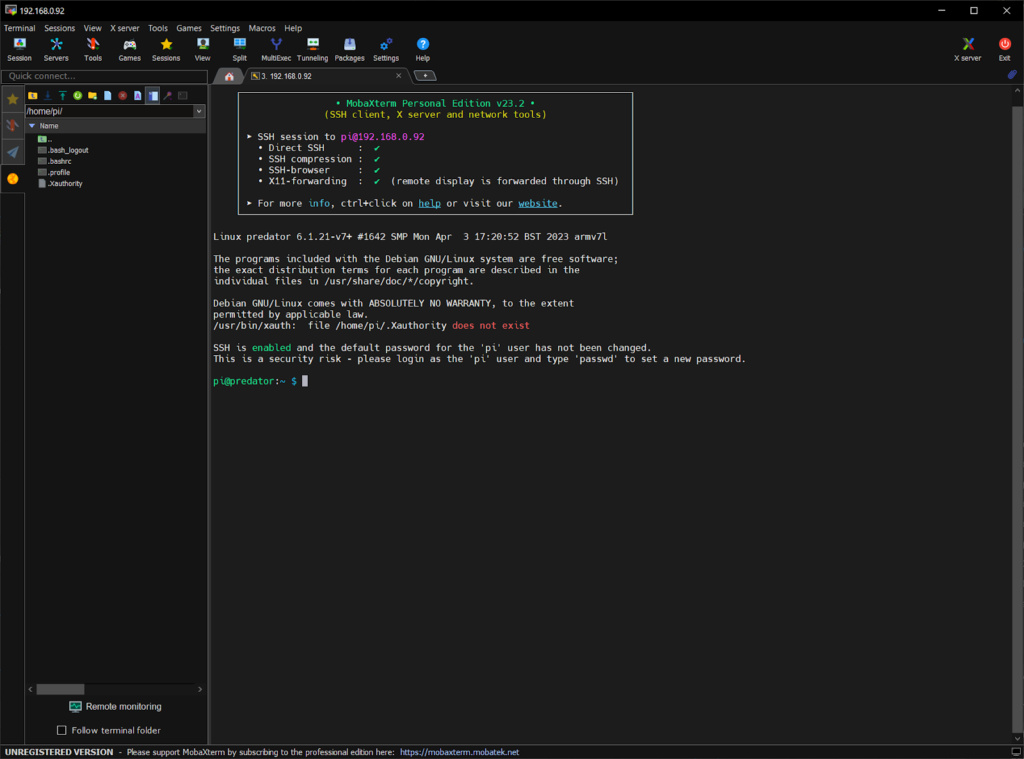
Update and Upgrade system, for that launch the following commands
sudo apt update
sudo apt upgrade -y
When done, install git.
sudo apt-get update && sudo apt-get install git -yonce git is installed, use the following command to download kiauh
cd ~ && git clone https://github.com/dw-0/kiauh.gitand finally launch kiauh
./kiauh/kiauh.sh.
Obviously nothing is installed. For my part, I will install Klipper (indeed), MoonRaker, Fluidd, KlipperScreen (I’m using an original Raspberry screen), Crowsnest (for usb webcam), MobileRacker Companion (i’m using the Smarphone MobileRacker app) with OctoeveryWhere (to use it when i’m not on my wifi network) and Pretty Gcode (just for fun).
All installation can take around an hour
activate auto login on raspberry pi to automaticaly lauch Klipper screen at start
⇒ Connect to ssh
⇒ Launch raspi-config
⇒ System option
⇒ S5 boot/auto login
⇒ B2 console autologon
at end, reboot
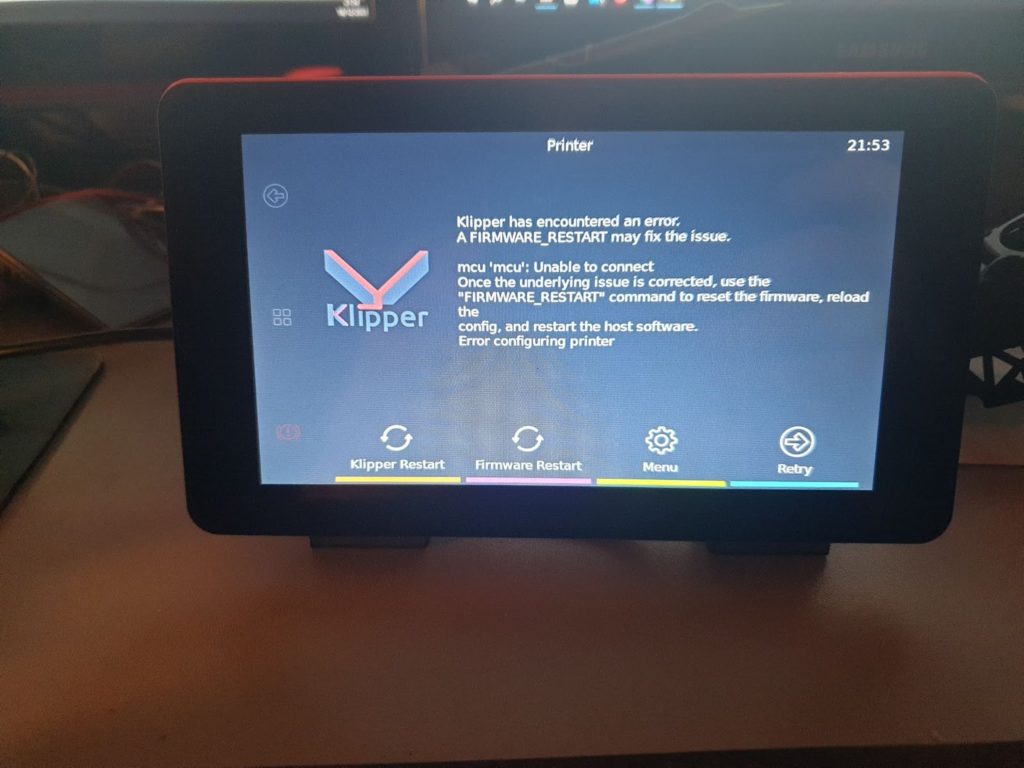
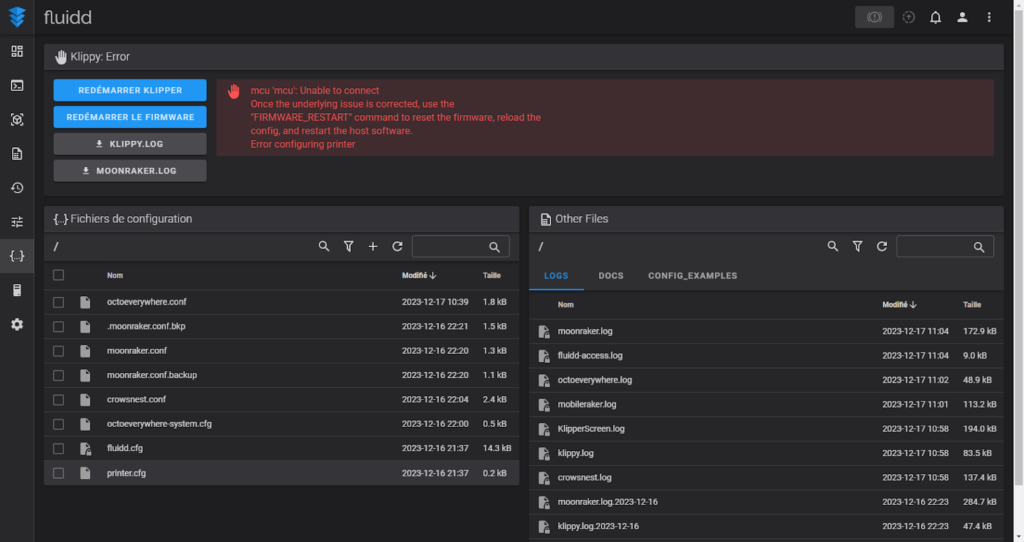
If Klipper screen don’t boot up, open ssh connection, login and type this command
systemctl status KlipperScreen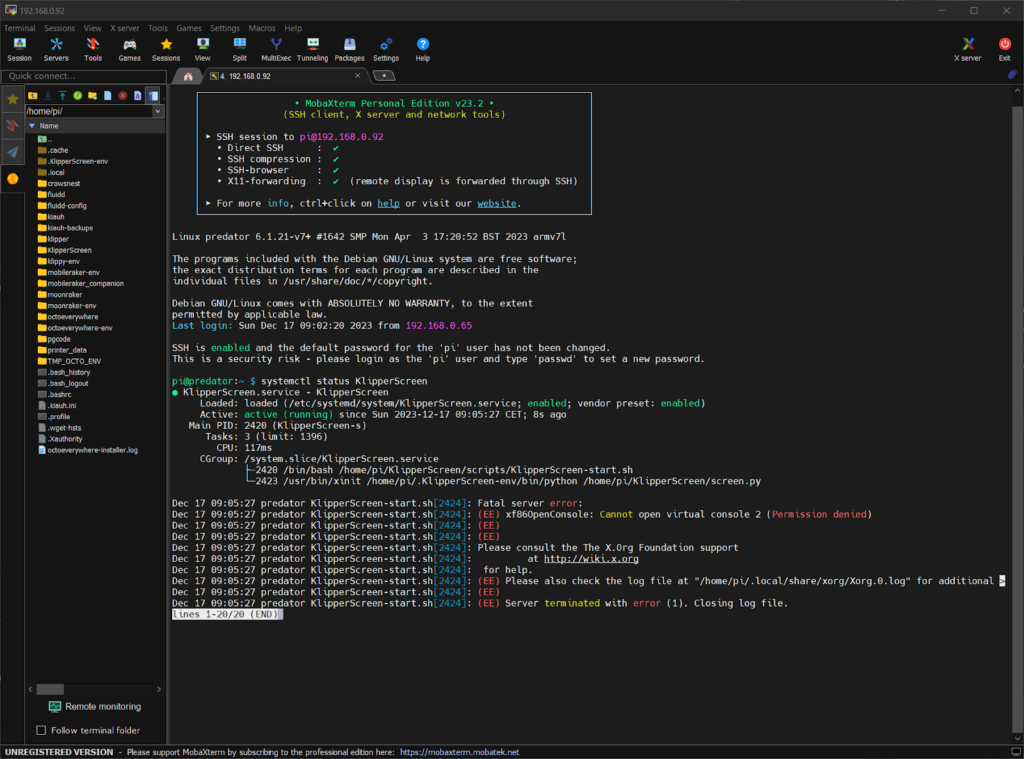
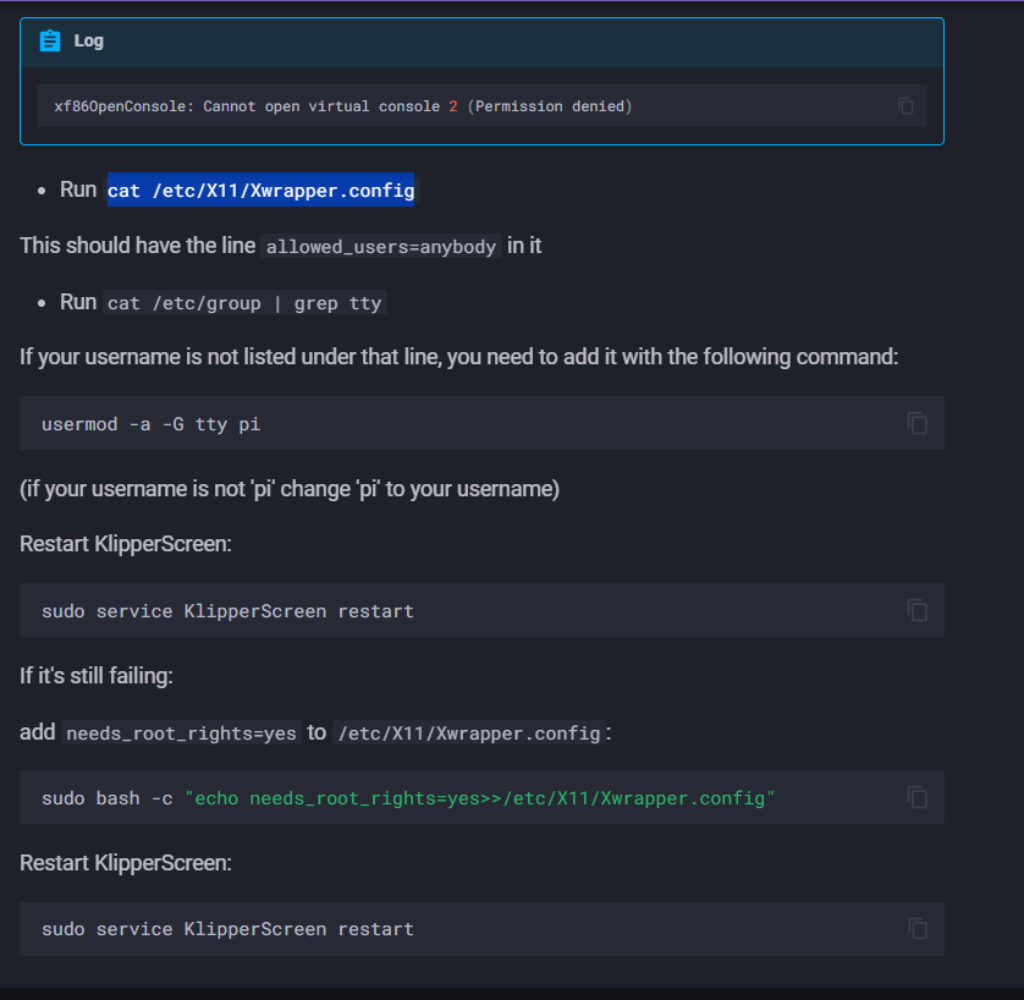
If like me you see this error
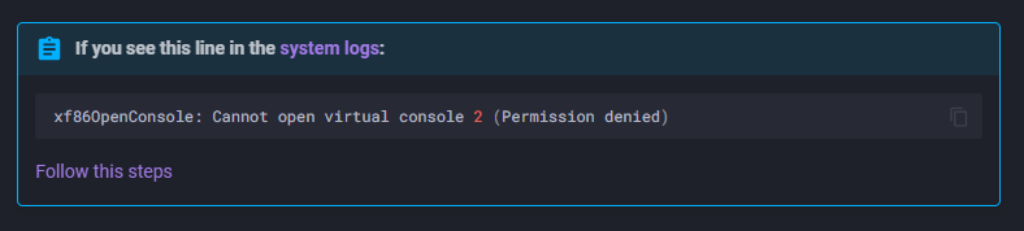
you have to do some more manipulation
Reference : https://klipperscreen.readthedocs.io/en/latest/Troubleshooting/VC_ERROR/
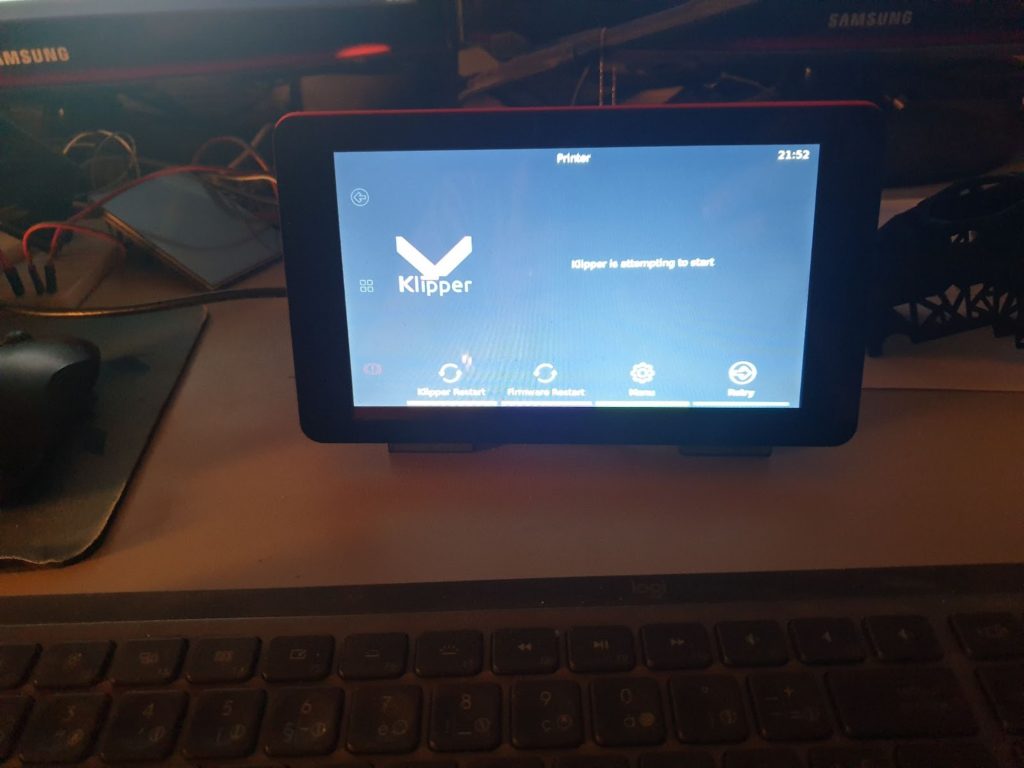
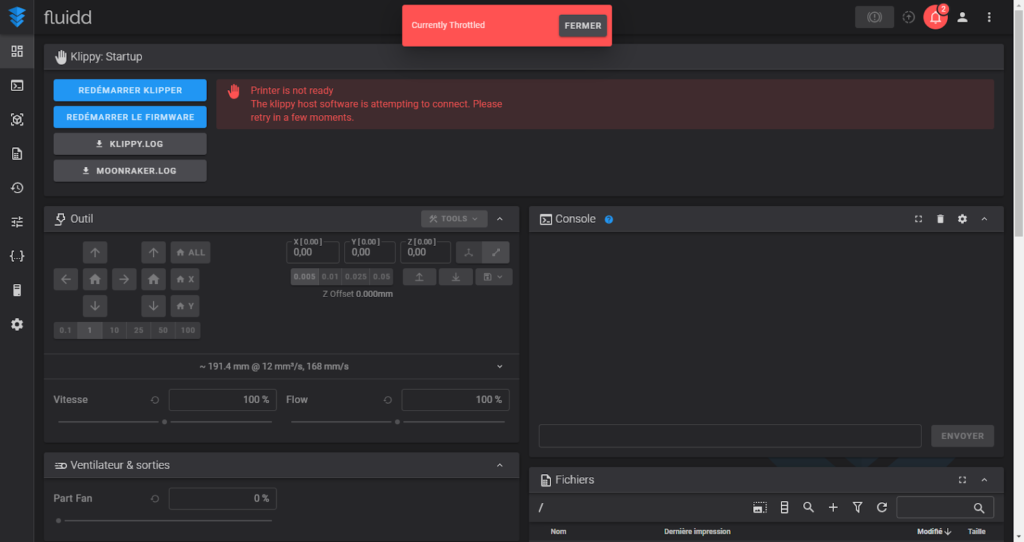
Normaly after reboot KlipperScreen pop up at start
Check also if you have access to Web Ui by typing raspberry IP address in web browser
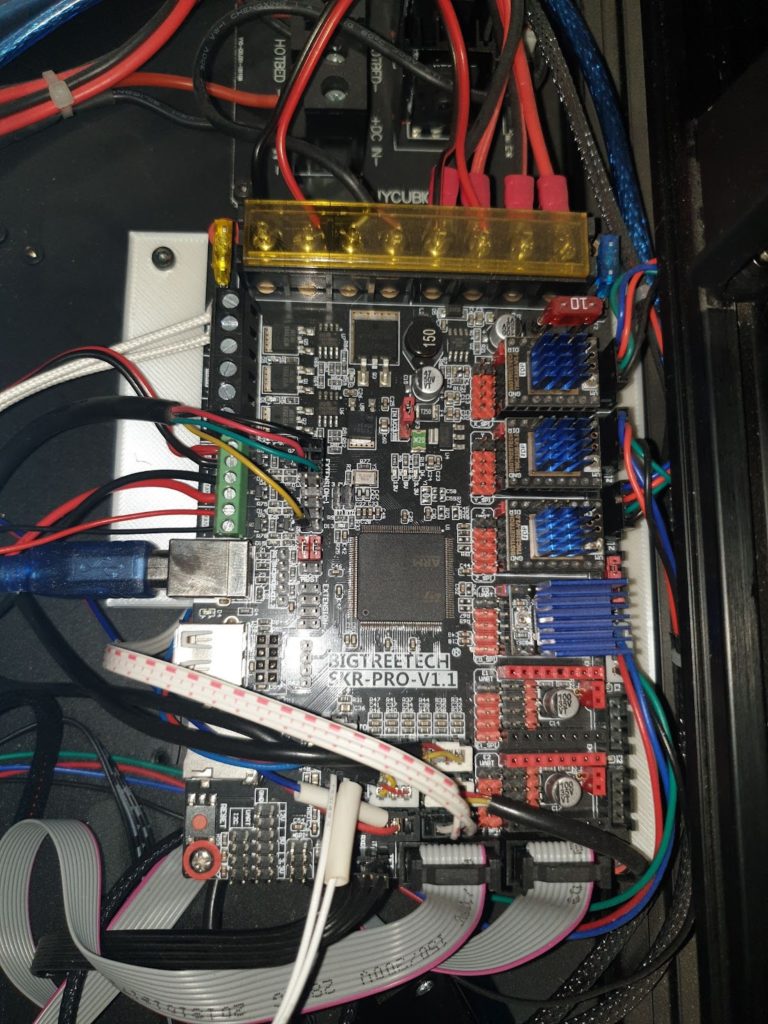
Once it’s done, time to build and install firmware on the printer motherboard.
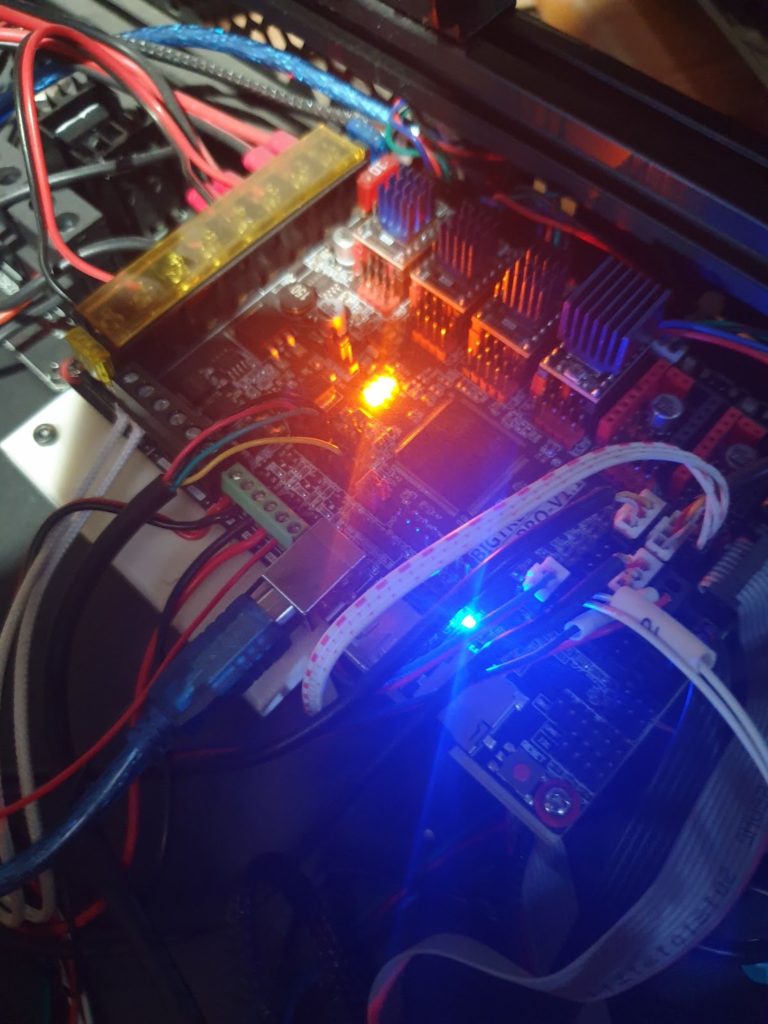
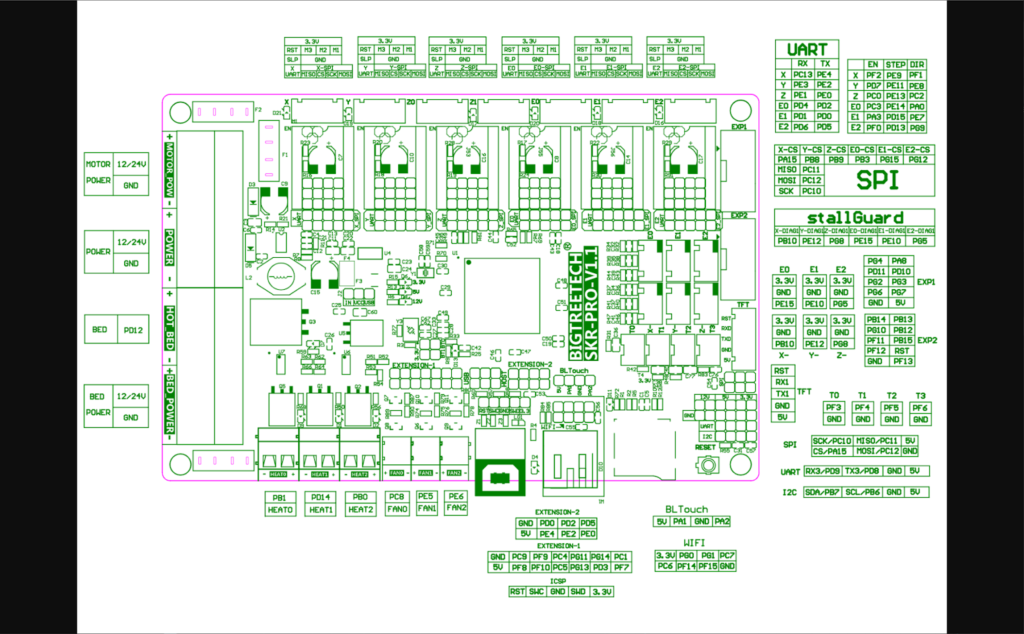
In my case, i’m using a BigTreeTech SKR Pro 1.1
go to Klipper folder and go to menuconfig
cd ~/klipper/
make menuconfig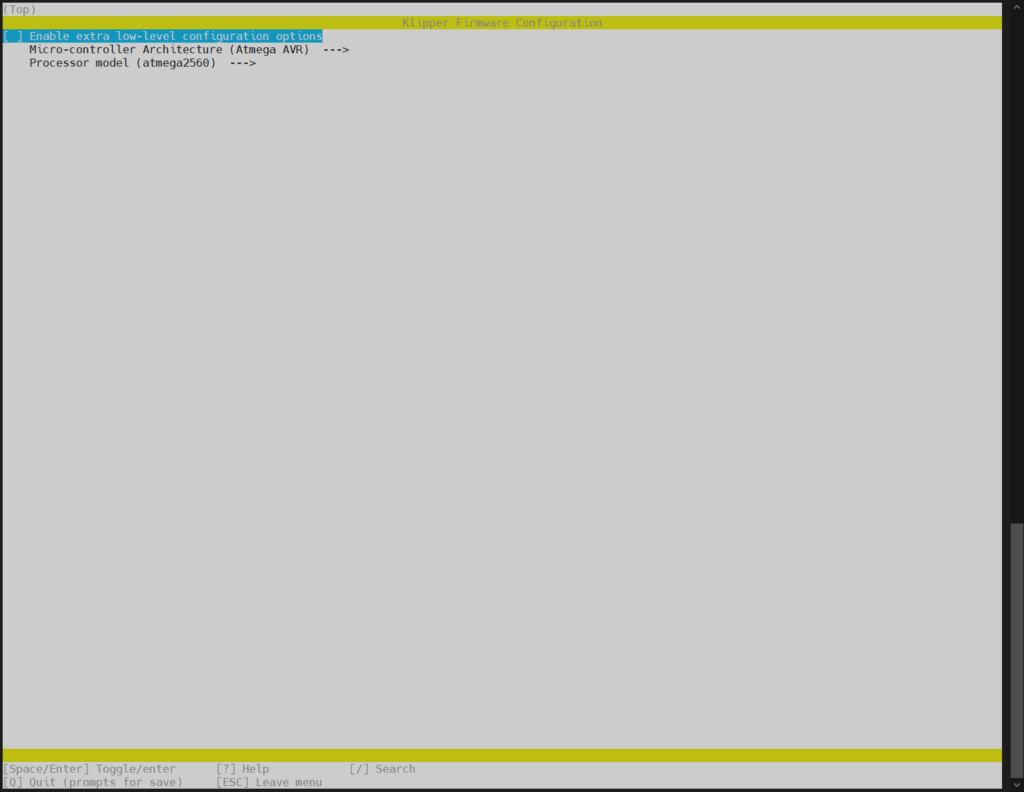
press spacebar to configure Low level configuration
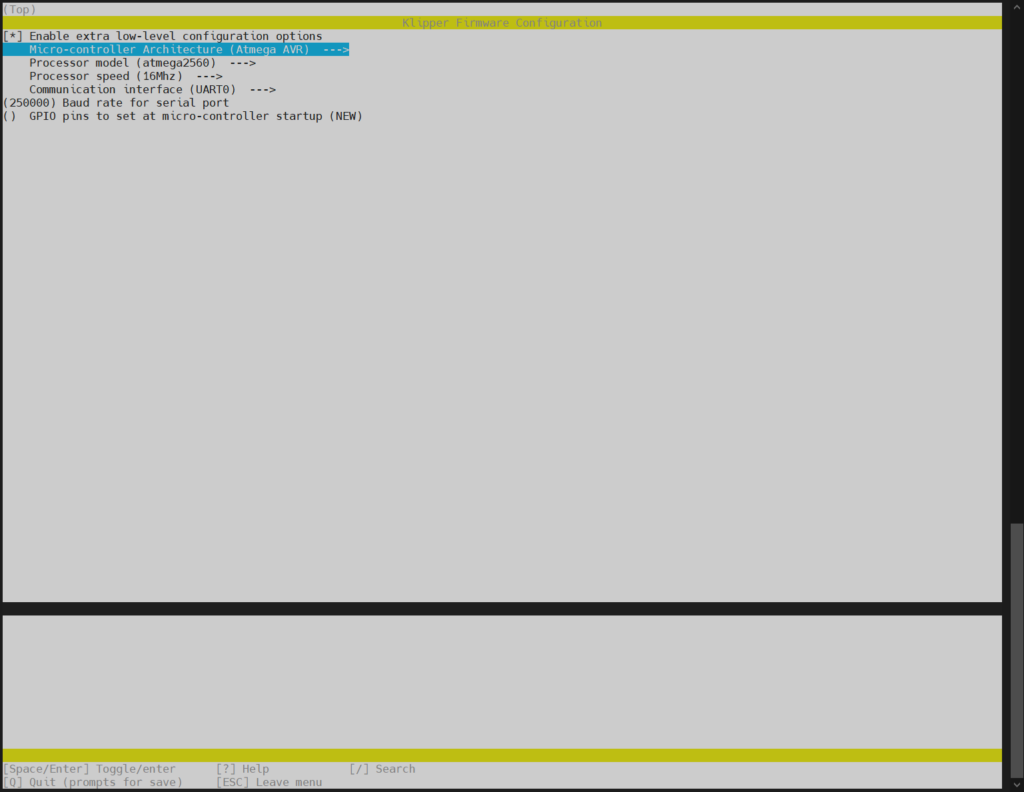
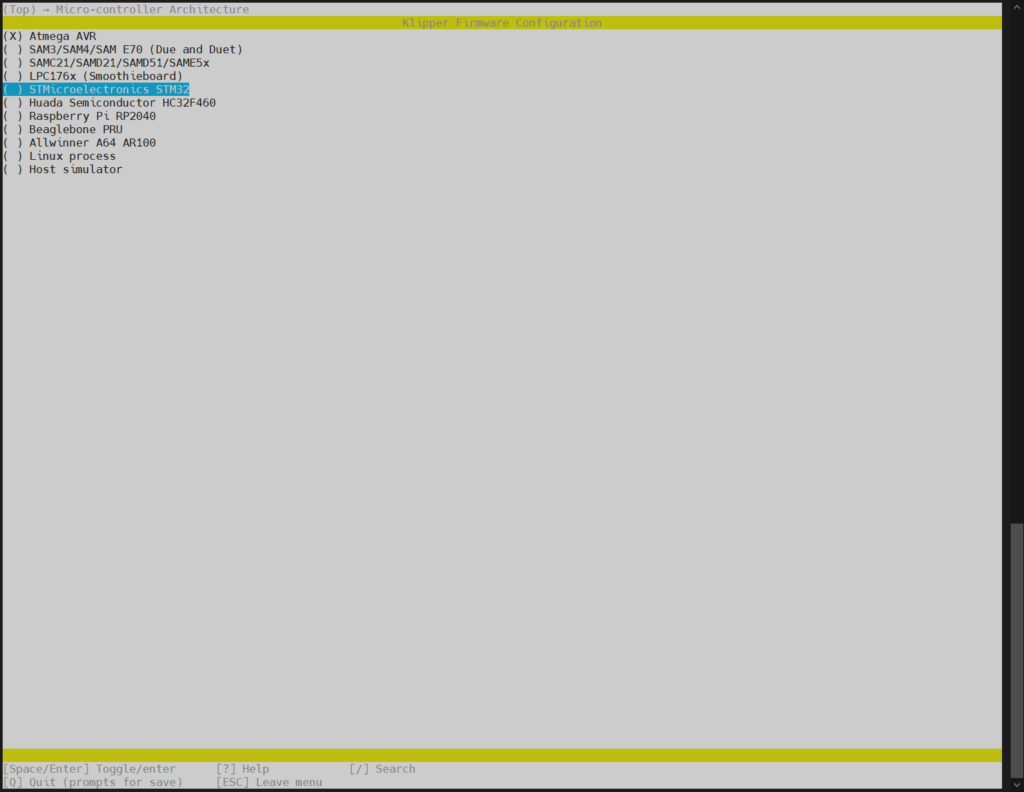
select microcontroller architecture by pressing space bar and select your motherboard
microchip architecture. in my case it’s STM32
After that, select your processor model. In my case it’s STM32F407.

By selecting the right processor, it will set the right bootloader.
Finally set the clock reference as internal
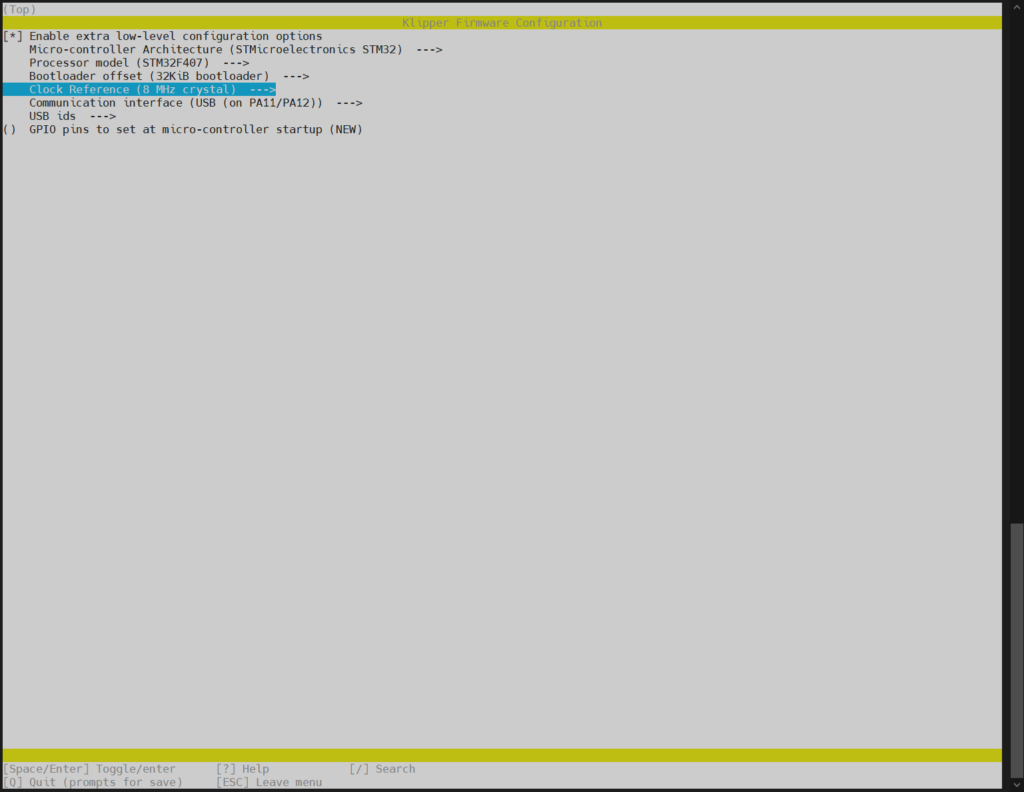
Then press Q to quit and Y to save
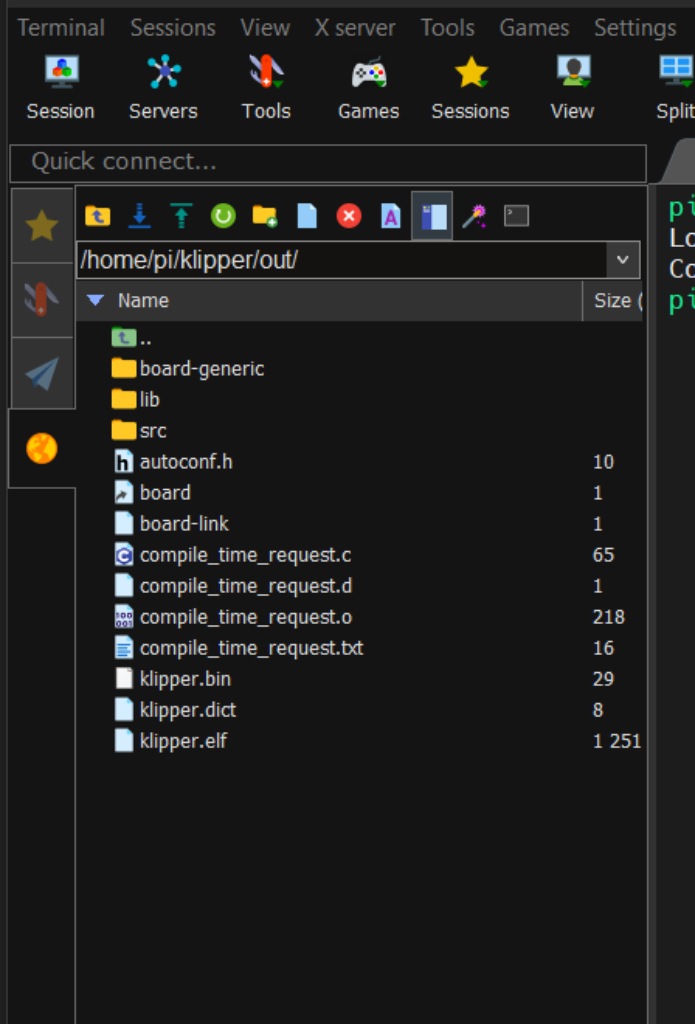
Type make to launch firmware building according to your settings.
This may take around 30 sec to build and at end you will see a line that a file named klipper.bin is created

The next procedure is only for SKR (Pro) motherboards because firmware can’t be flashed directly.
Go to Home/Pi/Klipper/Out and download the file named klipper.bin
Go to your download folder ( or where you downloaded the file), and rename it firmware.bin
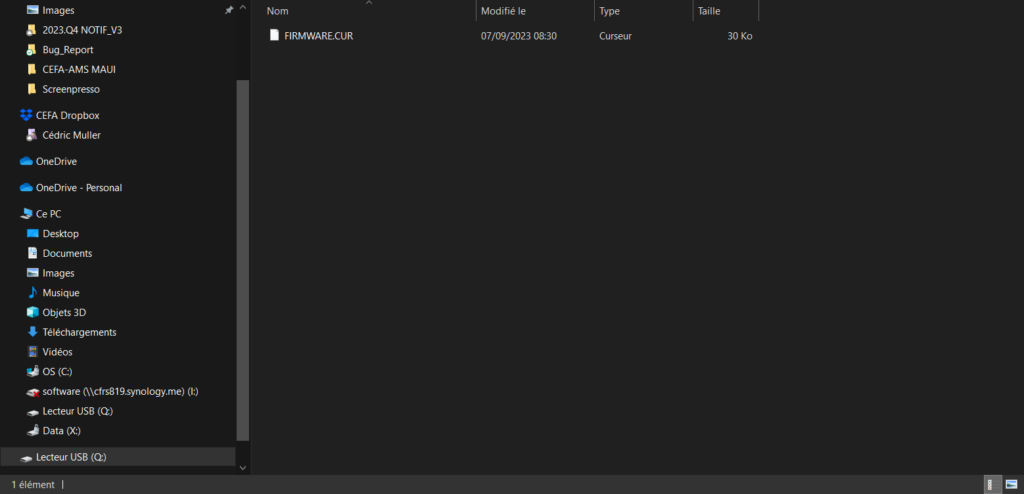
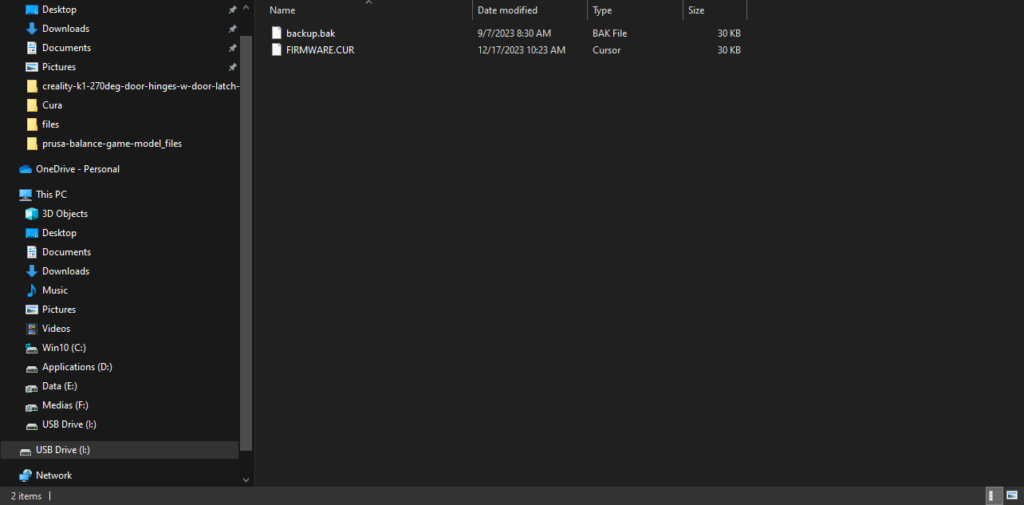
Grab the sd card supplied with the motherboard and plug it in your computer.
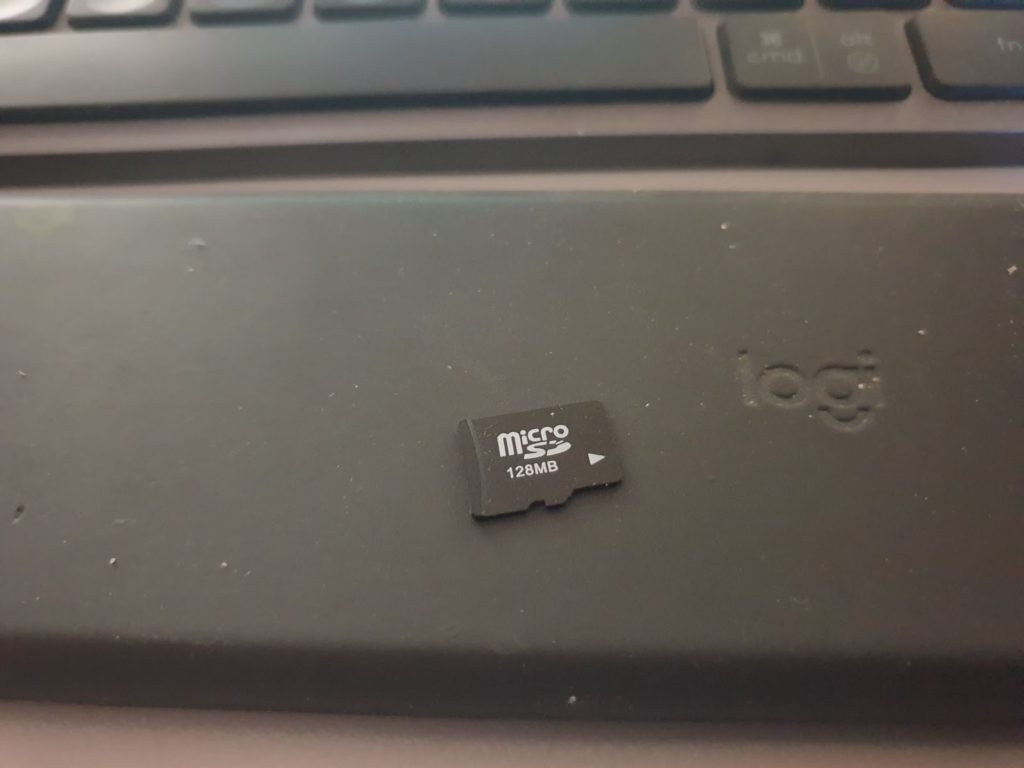
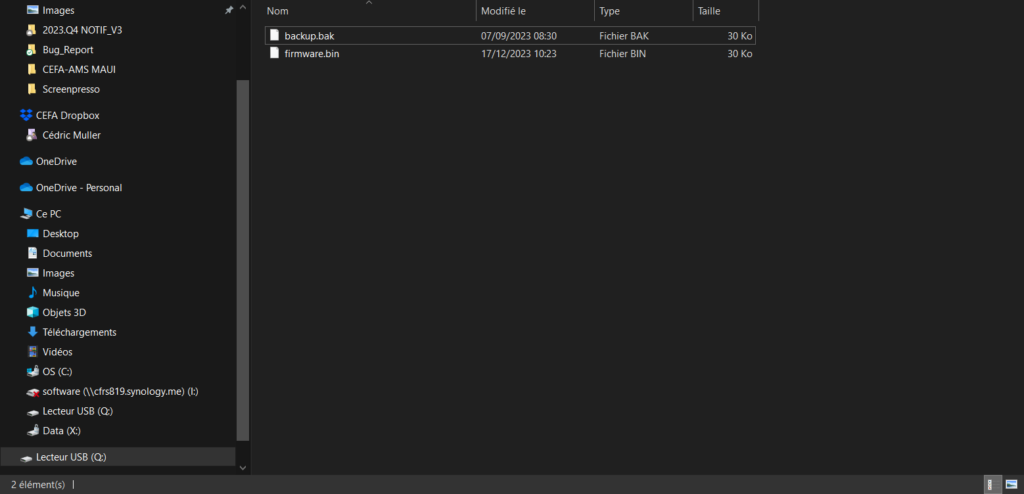
Inside the SD Card you will find a file named Firmware.cur. You can backup it by renaming it
something like backup.bak. Then copy the file firmware.bin in it.
Put the sd card in the motherboard slot, power it on and wait a min.
To be sure that firmware was installed, you can put back the SD card in your computer and check the content. if firmware.bin was renamed to firmware.cur, all is good.
You can now connect your motherboard to the raspberry pi.
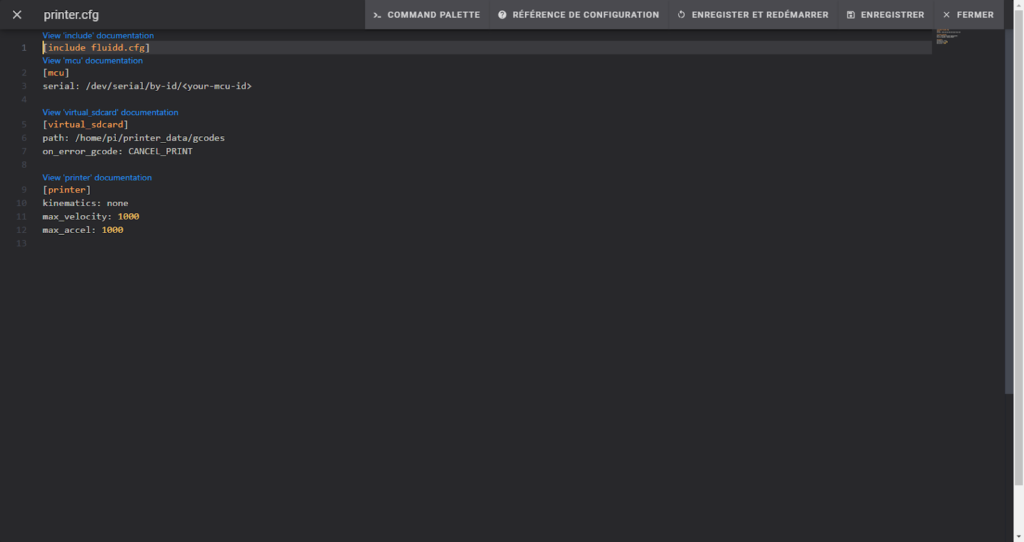
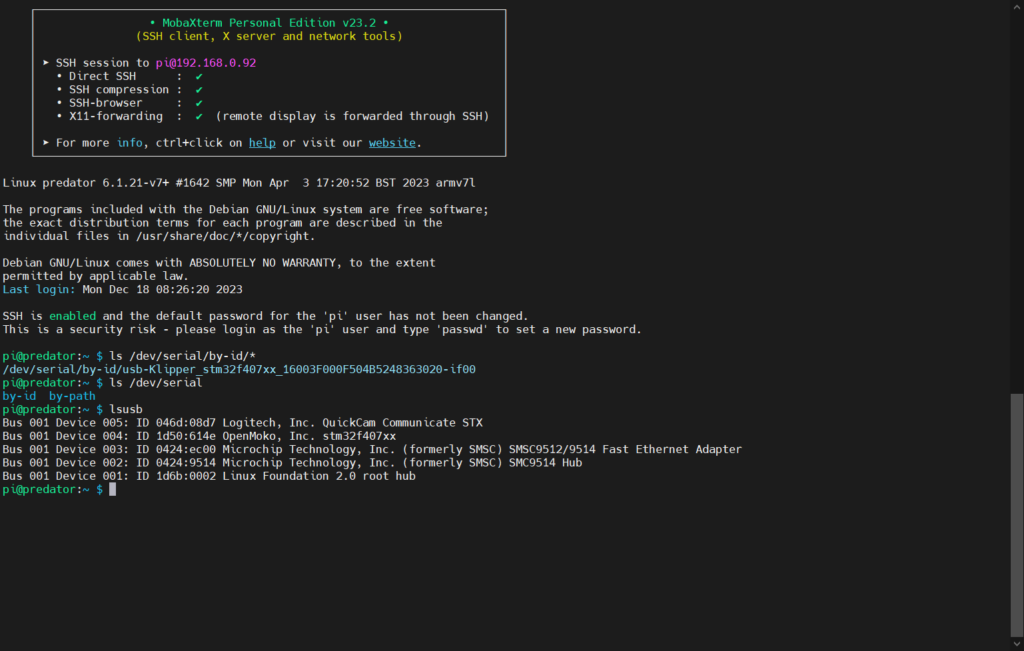
Next step is to get usb-id of connected motherboard to raspberry pi
For that launch this command in SSH client
ls /dev/serial/by-id/*
Normally only one ID is shown.
The name is a little bit obvious, Klipper + motherboard type + ID
Copy the serial ID.
Go on Fluidd Web UI and go to configuration section. Inside the section, find the printer.cfg file and edit it
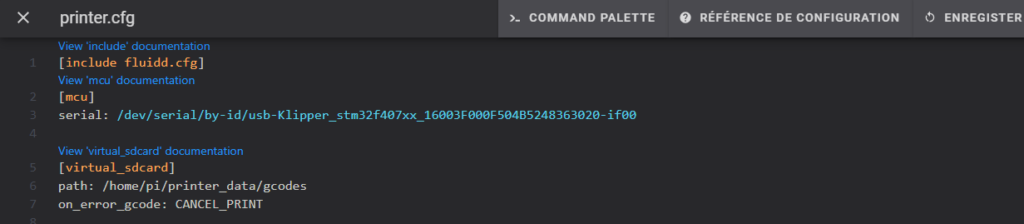
when done, save and restart.
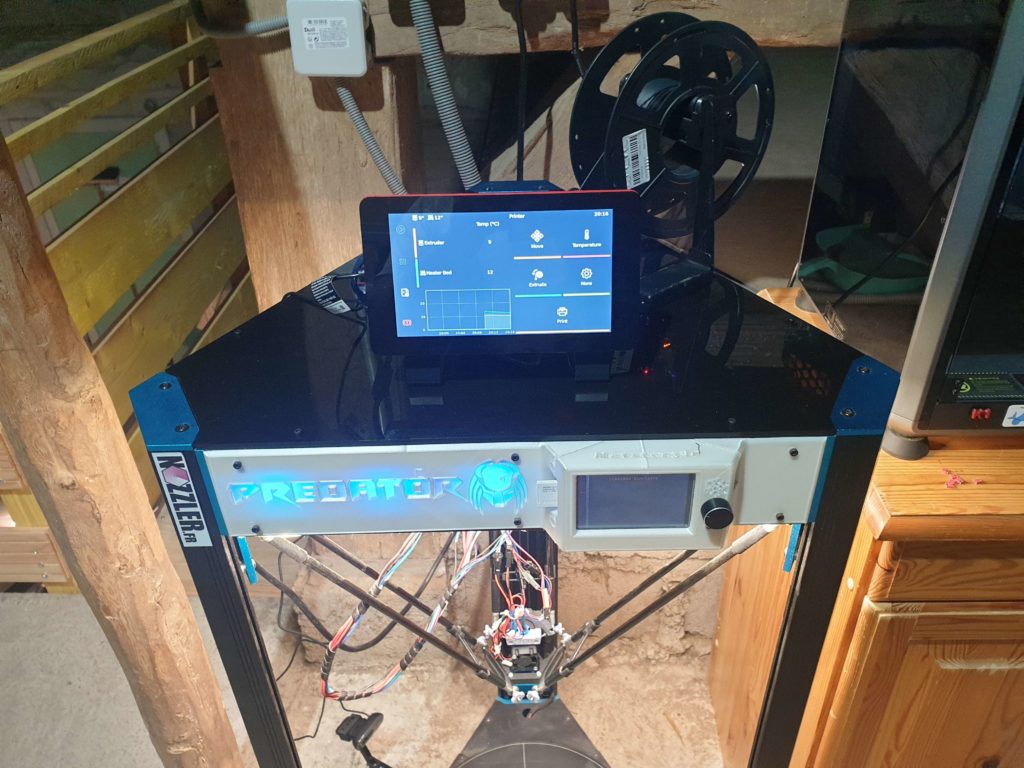
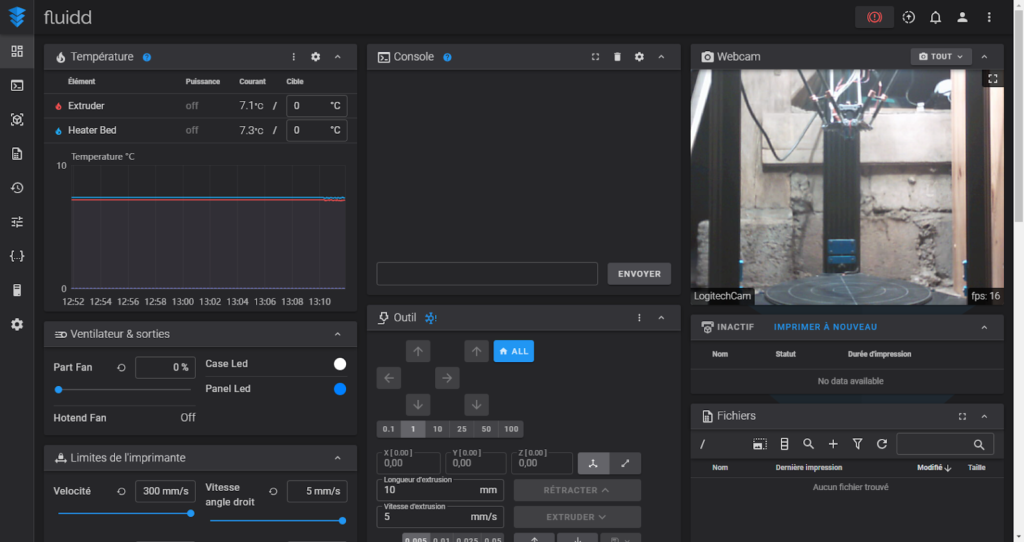
Now, all are connected and work together.
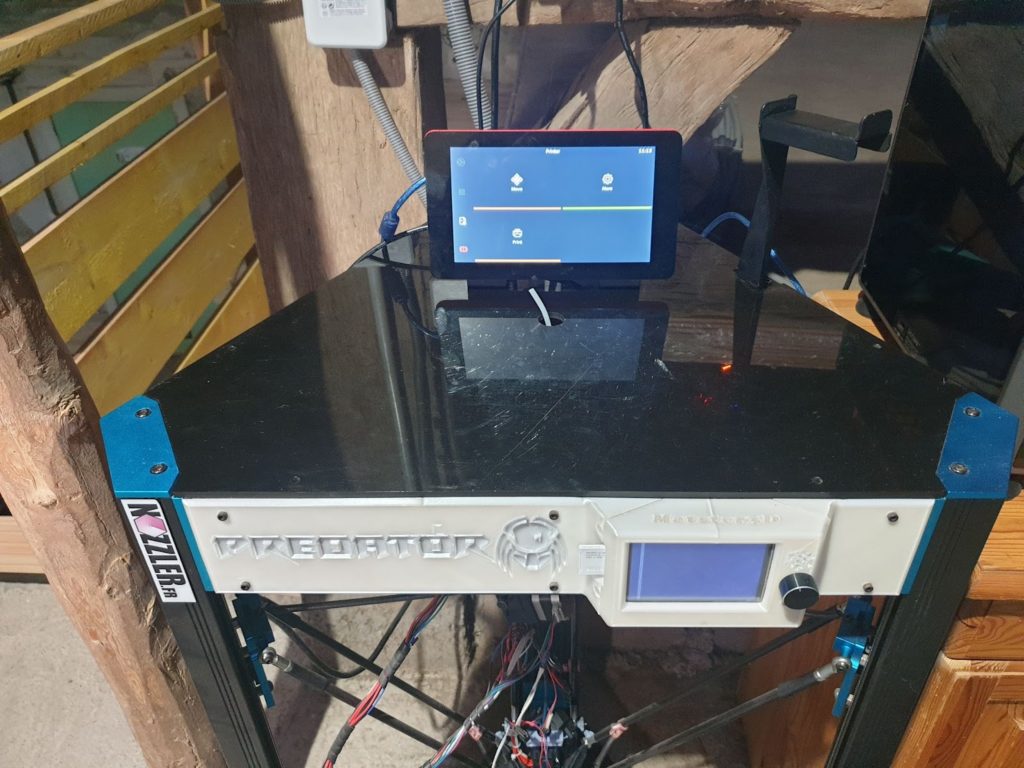
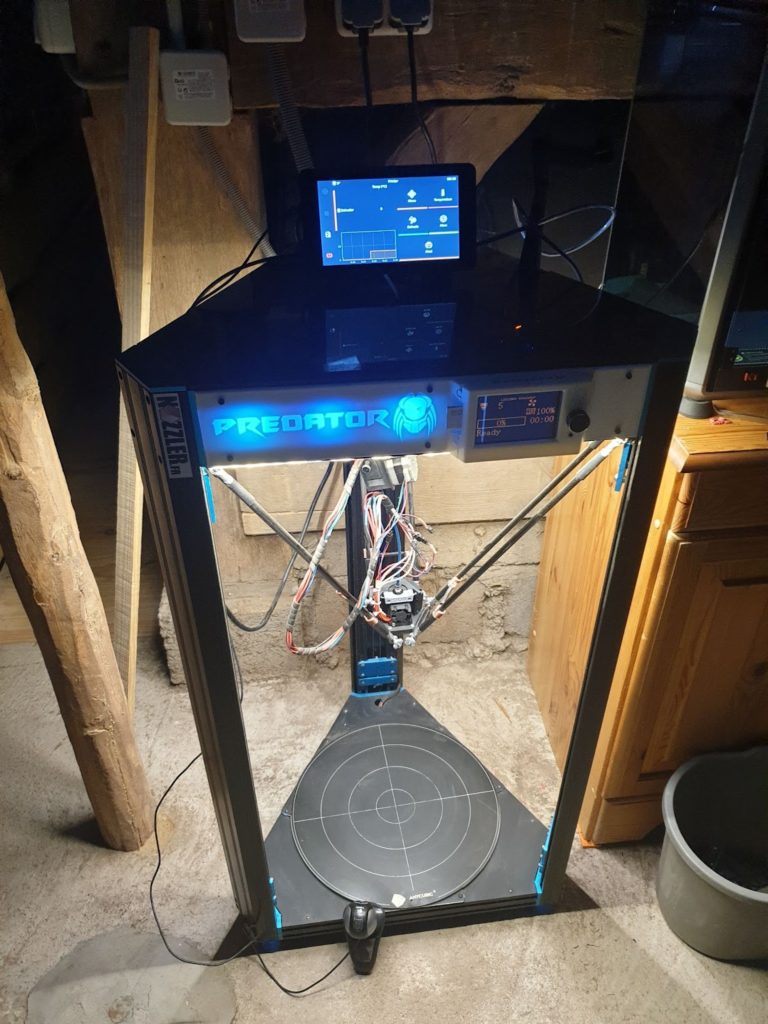
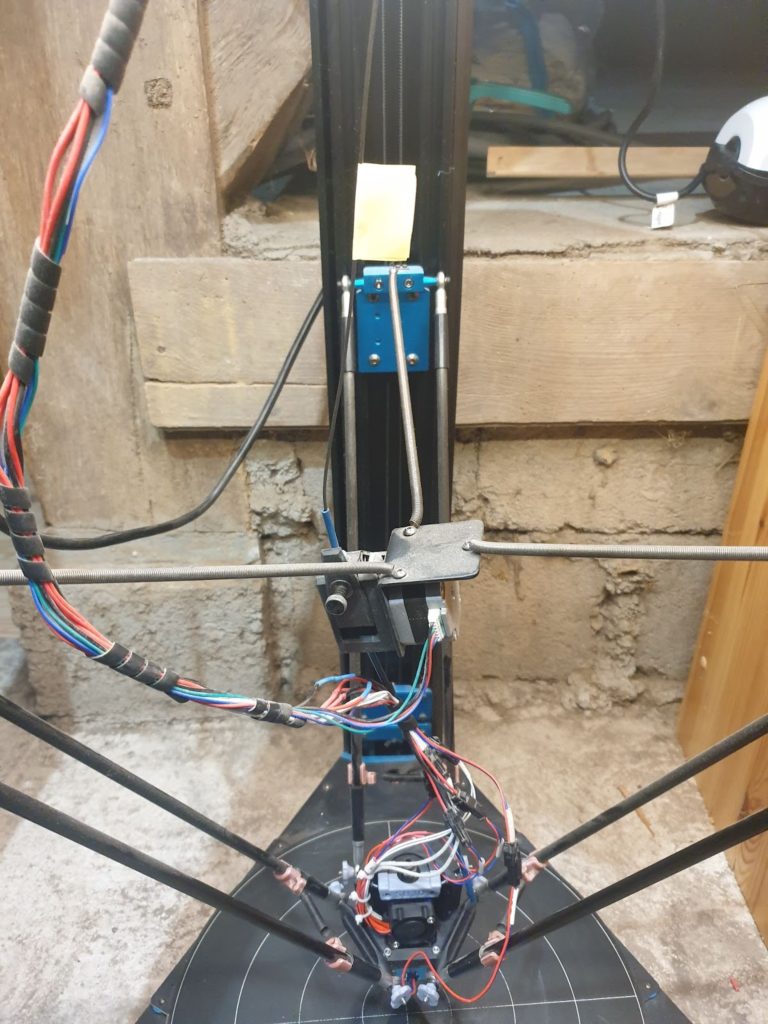
I will now set up the raspberry pi to its final position (on top of the printer) and launch it with the printer !

Seems to work ! Great !
The second part now is to configure your printer.
For that I assume that you know all about the electronics of your printer and configuration of it.
For me, as electronics are custom, marlin on it was done by me and so i have all the pin out and drivers reference.
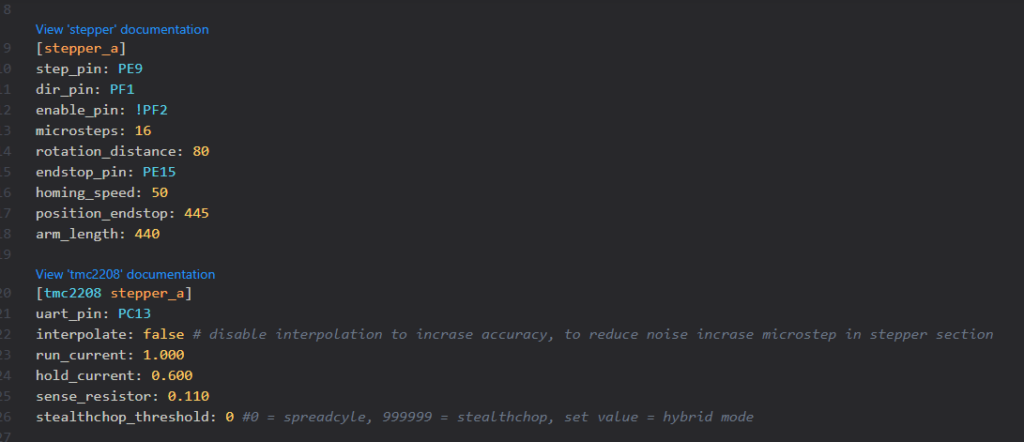
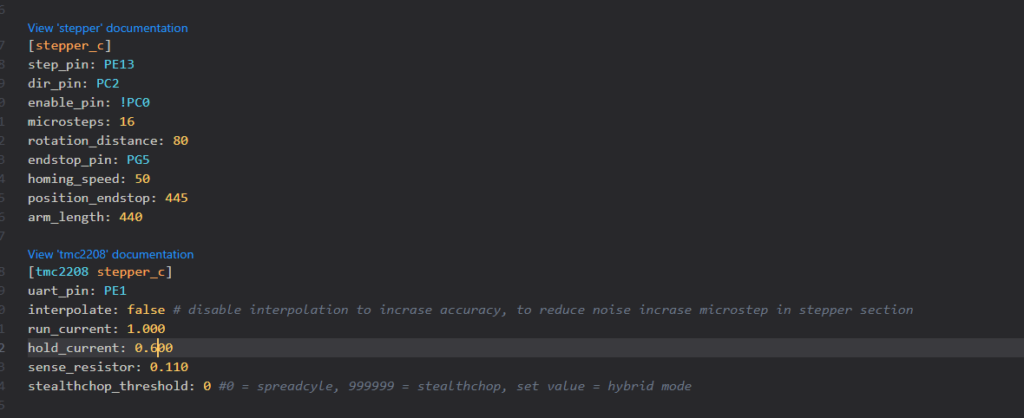
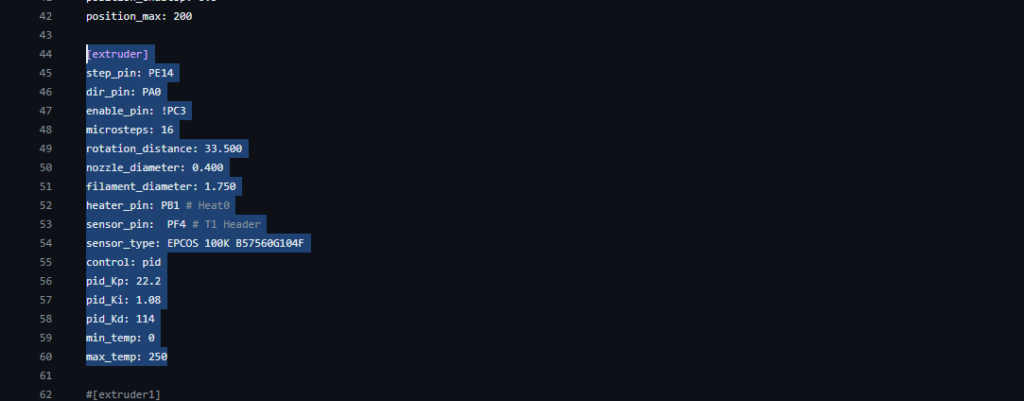
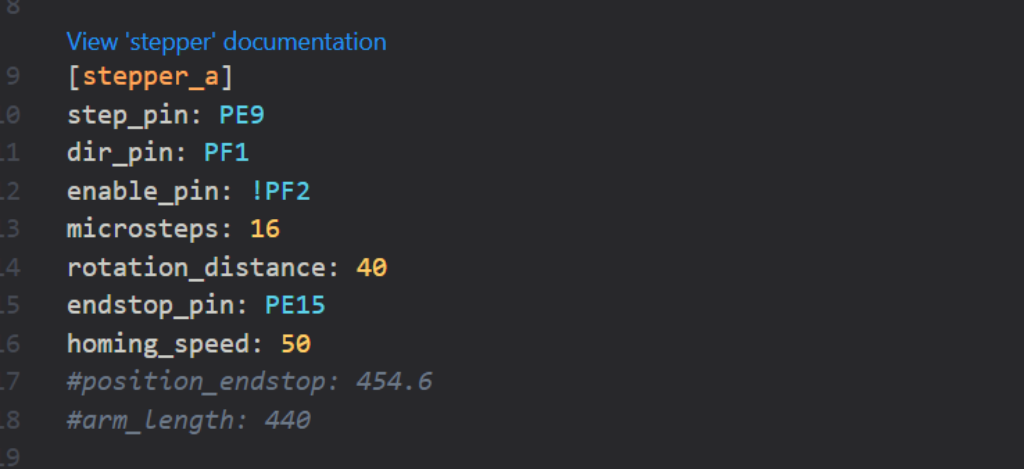
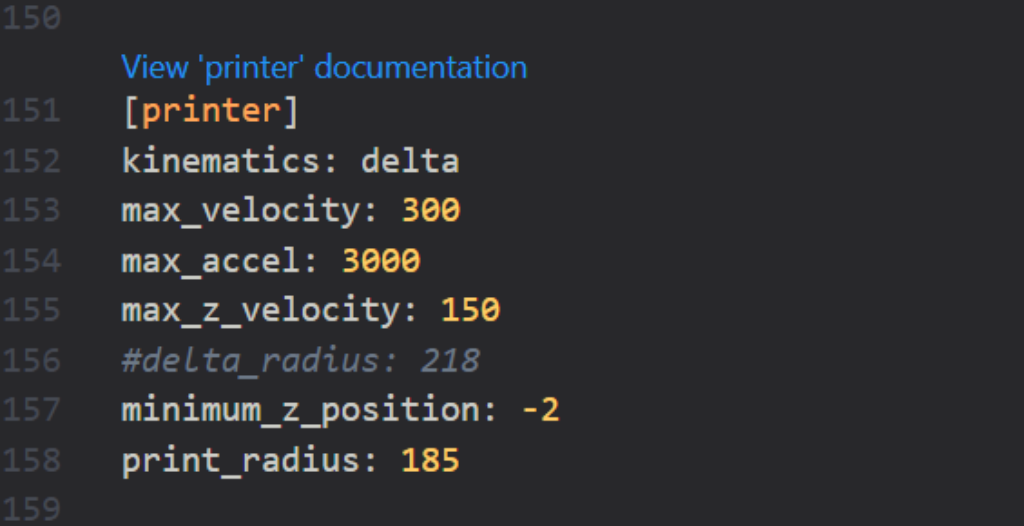
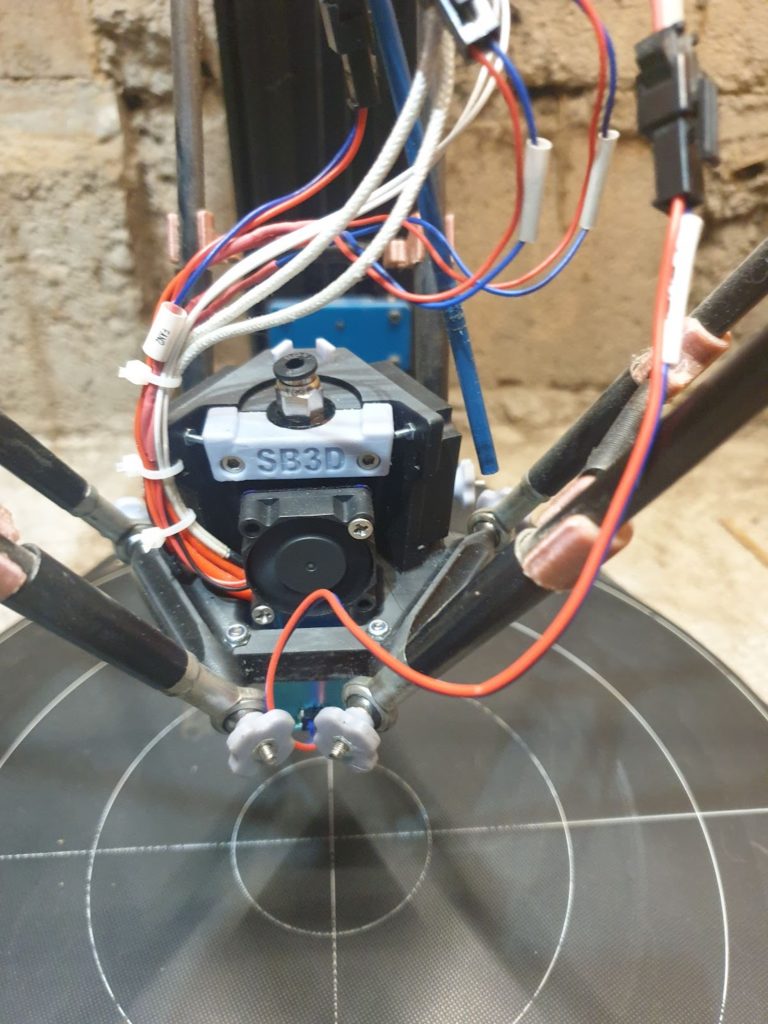
First thing is to change the kinematic of printer according to your printer
Mine is a delta

Next thing is to configure steppers and drivers.
I copy pinout definition from BTT exemple repository
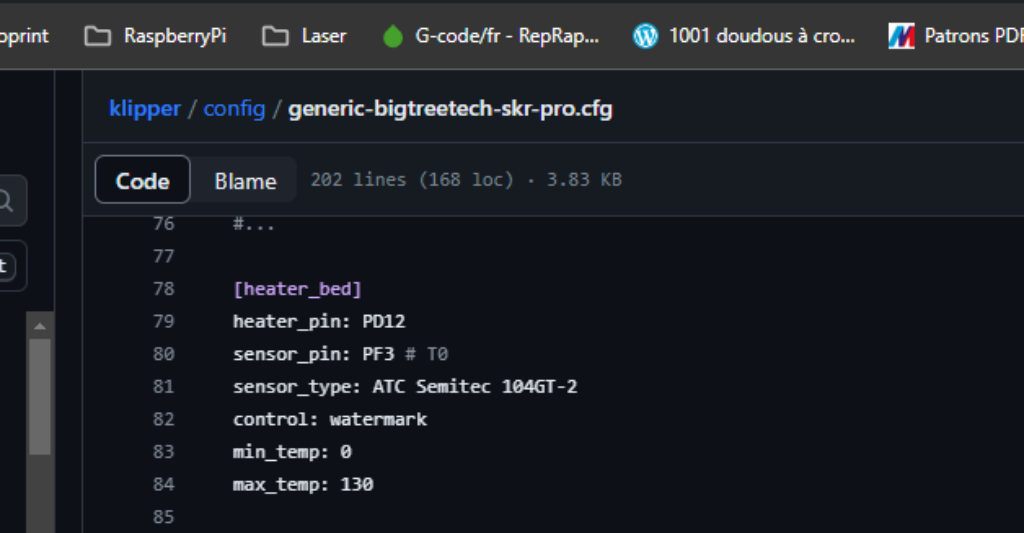
https://github.com/Klipper3d/klipper/blob/master/config/generic-bigtreetech-skr-pro.cfg
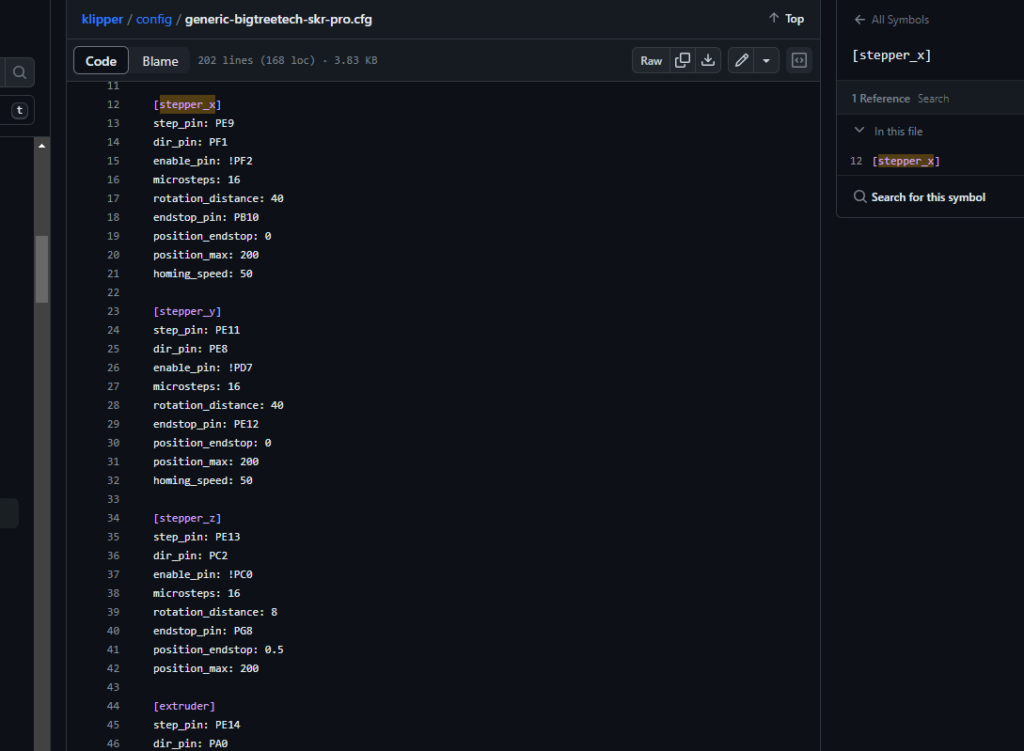
Some changes must be made according to my printer kinematic.
stepper_x, stepper_y and stepper_z must be renamed stepper_a, stepper_b and stepper_c.
Some parameters must be removed and other added
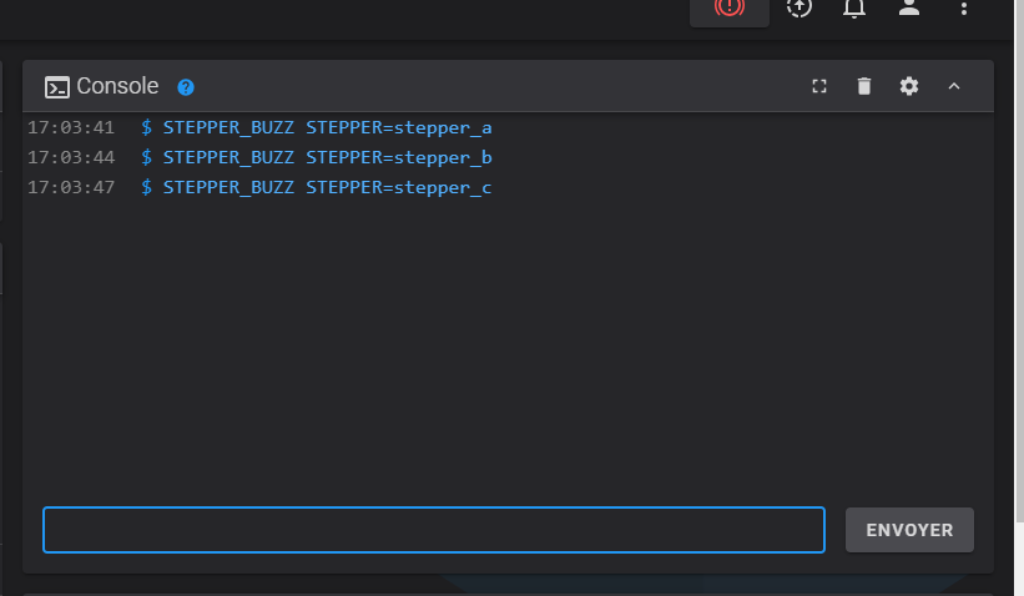
Be sure to have your motherboard pinout diagram, as i have use max_endstop instead of min, i have to change the pin attribution of endstops
to be sure that my endstop is correctly wired and working, i launch a Query_endstop command in Fluidd console
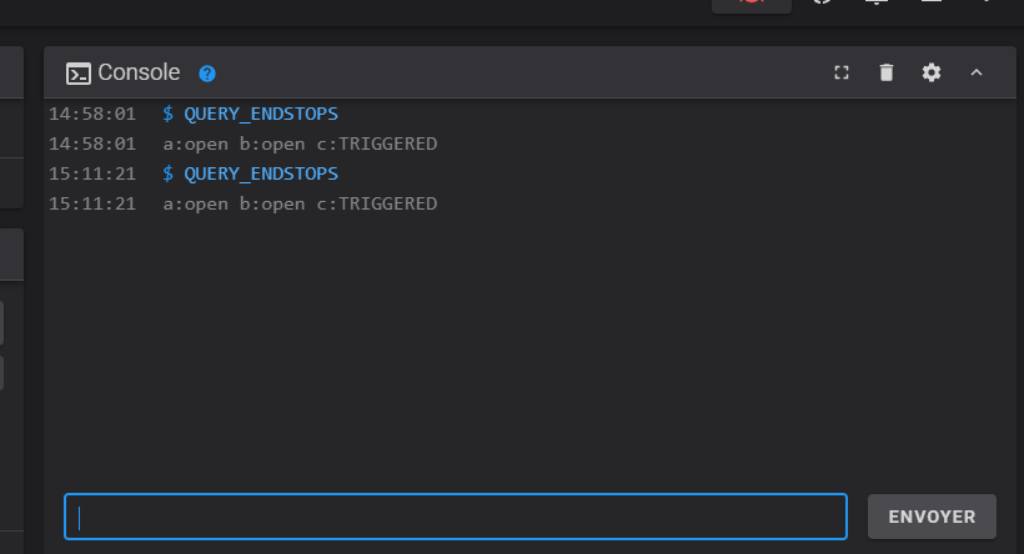
It works !
Now it time to configure drivers
Mine are TMC2208 working in standalone mode (on marlin), but they can work with UART mode. I will plug some jumper on motherboard and then copy TMC2208 configuration on printer.cfg
One important thing, if you are using a non communicant driver like A8948, DRV8825, LV8729 or even a TMC in standalone mode, the next section is not needed. You just have to fix microstep and rotation distance in motor section
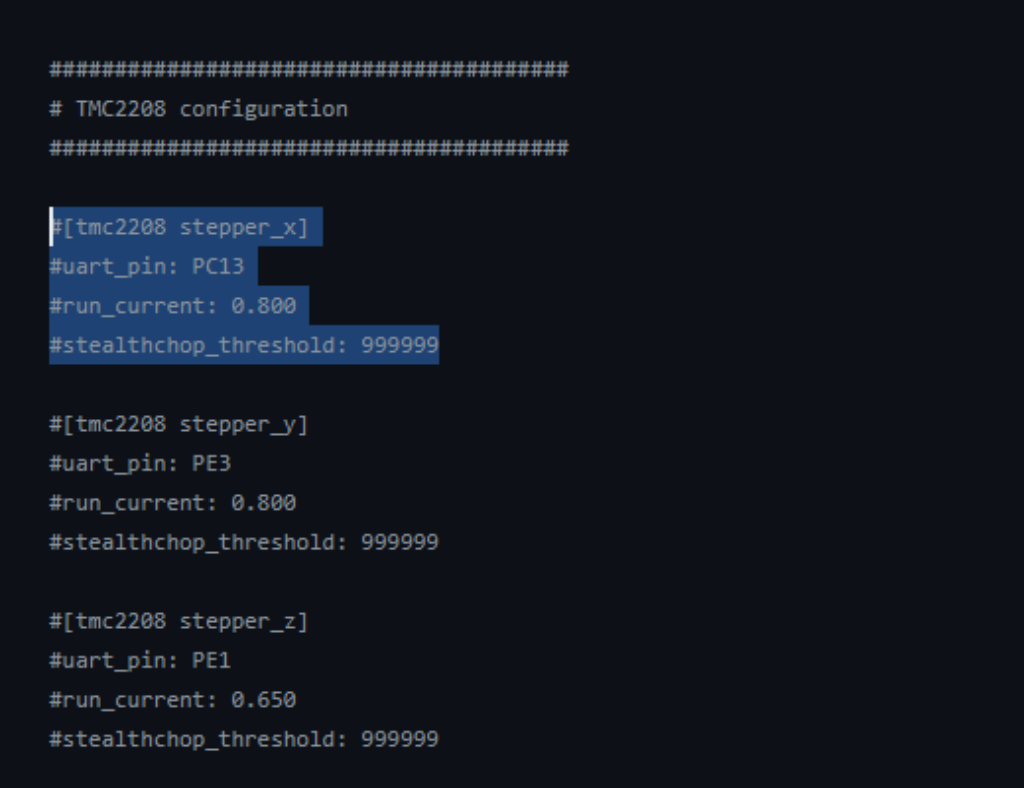
Finally my configuration is :

If all is well configured, you can run those command in fluid without any error
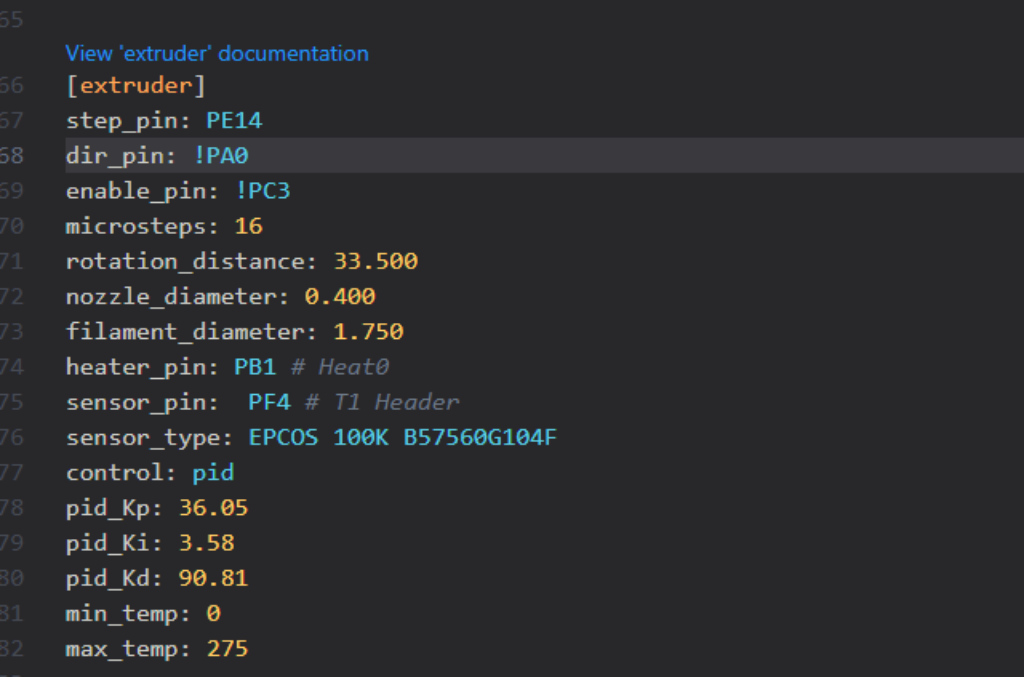
Time to configure the Extruder and Heater bed !
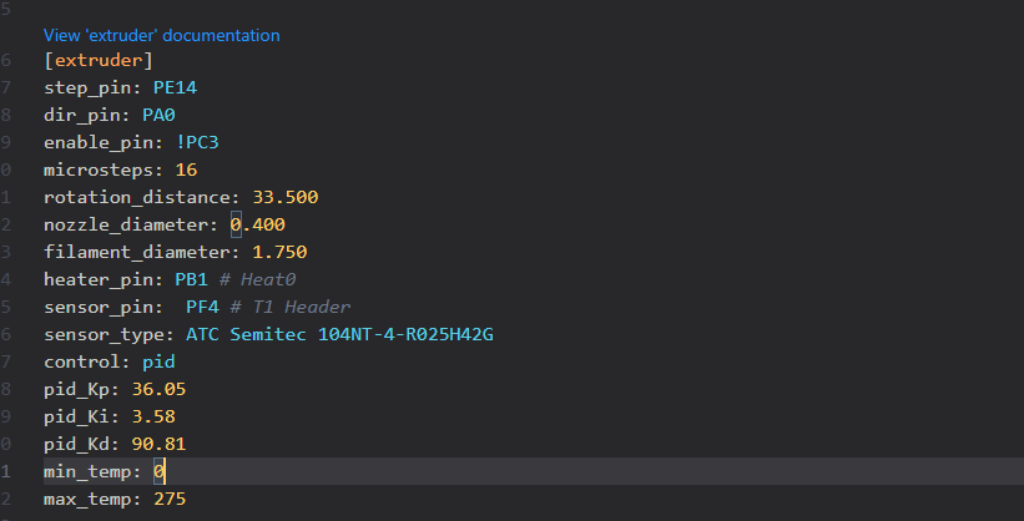
Start with the extruder.
for temperature sensor i use this Klipper reference
https://www.klipper3d.org/fr/Config_Reference.html#capteurs-de-temperature
then I set all parameters according to my previous value (comes from marlin configuration.h)
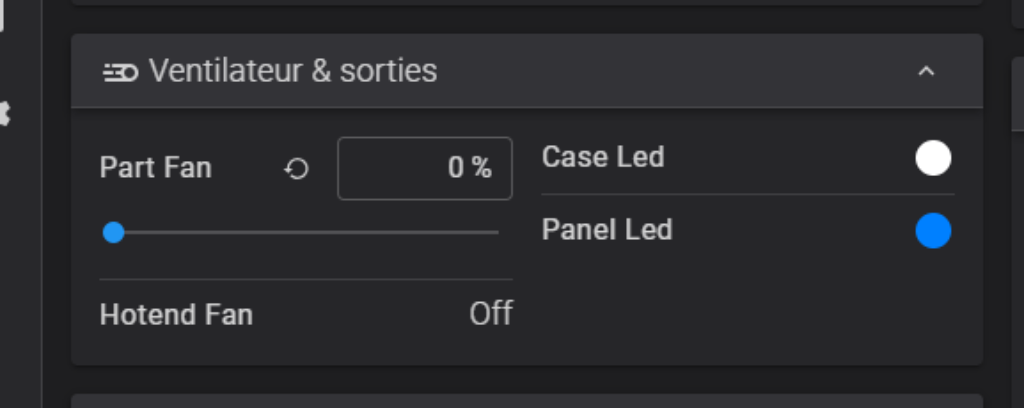
when done, fluidd UI will show a bit more !

To continue on the extruder, we will now set the extruder heatsink fan and part cooling fan.
First the Extruder cooling fan
I’m using fan.cfg reference of Klipper config found on github
https://github.com/zellneralex/klipper_config/blob/master/fan.cfg
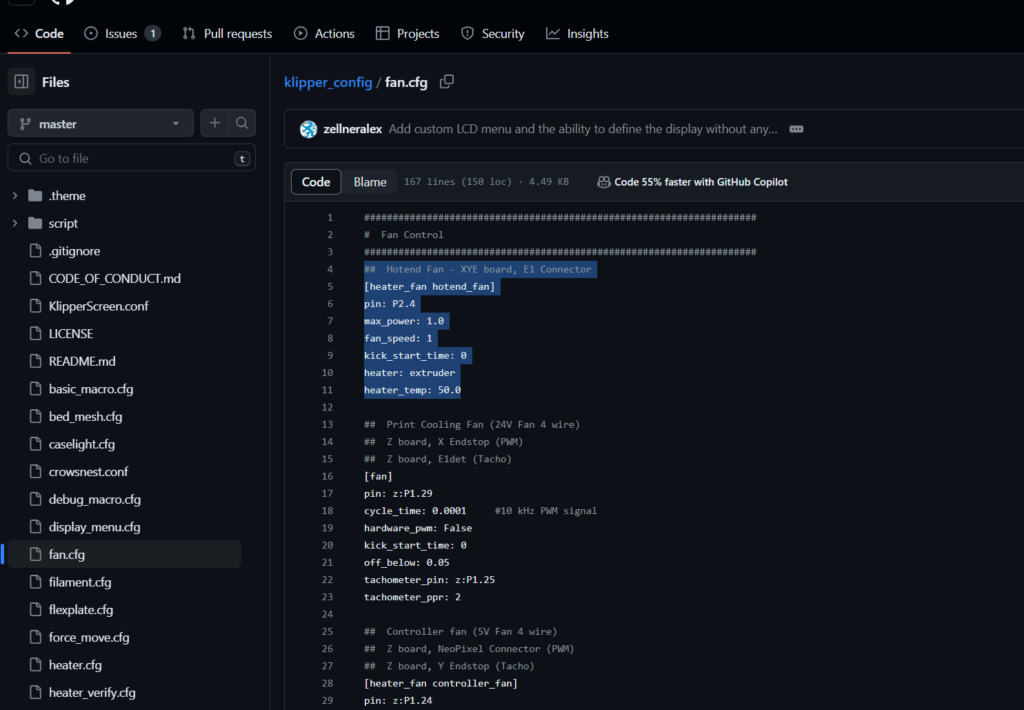
I copy paste to my printer.cfg and adapt it according to my electronics.
With this configuration, the fan will automatically start when the extruder is set above 35°C and stop when below 35°C. I also define the pin for part cooling fan
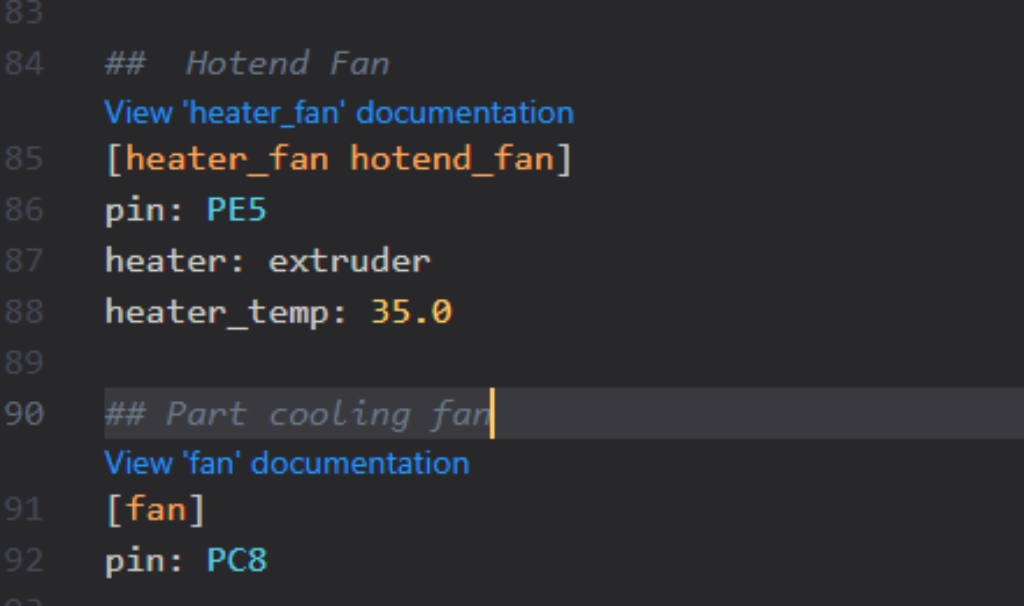
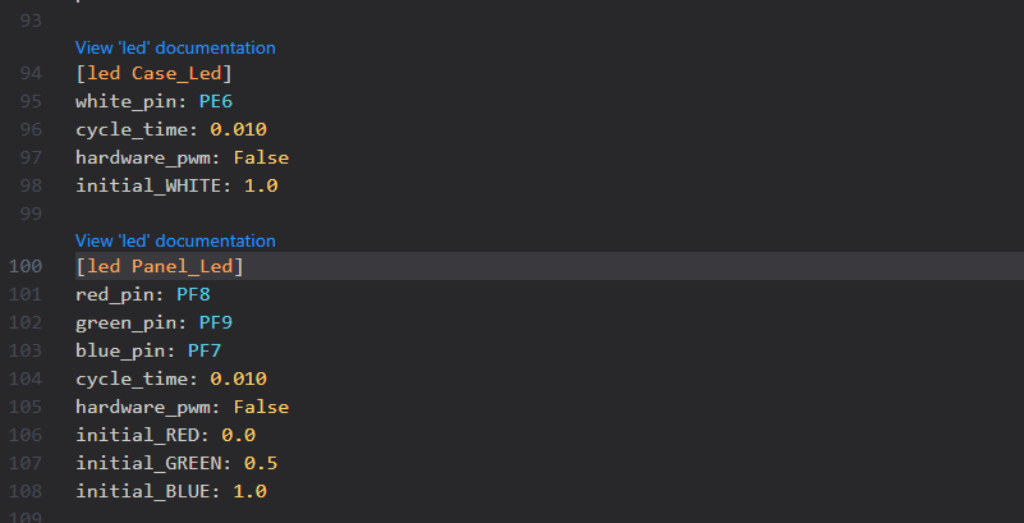
This board has three slots for pwm control, normally used to control fans. But on the last plug I have connected the case light.
So i define a Led section in the cfg file according to the documentation
https://www.klipper3d.org/fr/Config_Reference.html#leds
I also have some custom RGB led in the front panel. I define them just after the case led
Before configuring the hotbed, I will configure the filament detector and the probe section.
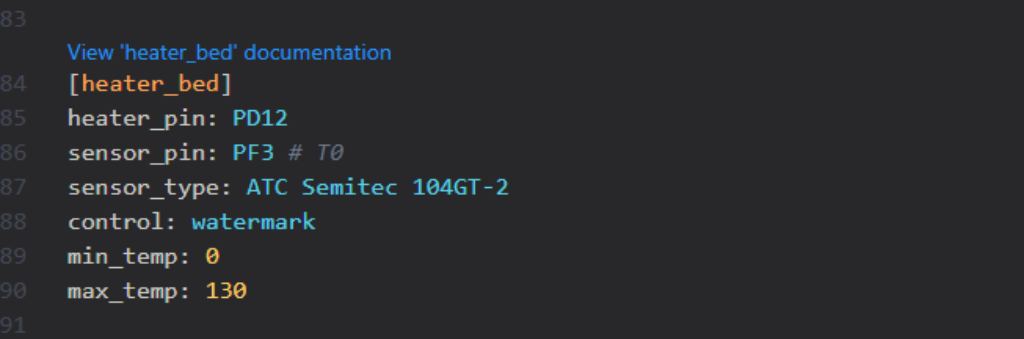
And now, it’s time to do heater bed :
Start from configuration provided on Klipper exemple
I’ll copy that to my printer.cfg file and continue configuration.
For bed mesh leveling, I will also start with a basic configuration
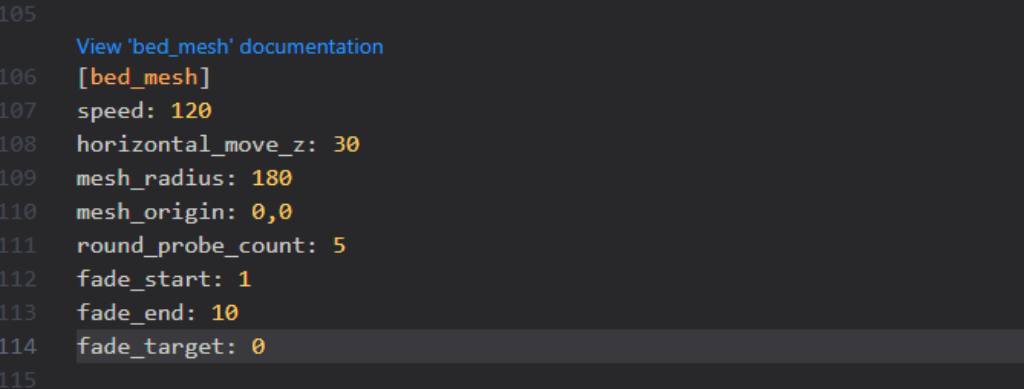
And will add some more parameters when all works
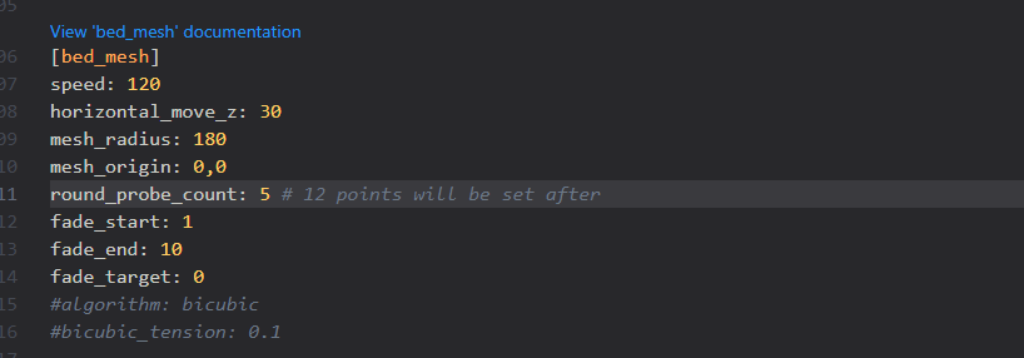
As my kinematic is Delta, according to Klipper documentation i have to add one more section in printer.cfg. The delta_calibrate, to enable auto calibration that will be really useful
https://www.klipper3d.org/Config_Reference.html?h=pixel#linear-delta-kinematics

Last thing I will do is to configure the original screen mounted on it.
For that I will go to the Klipper configuration example repository ( https://github.com/Klipper3d/klipper/tree/master/config ) and search for my SKR Pro 1.1.
In the cfg file, at the end there the EXP1 and EXP2 pinout configuration
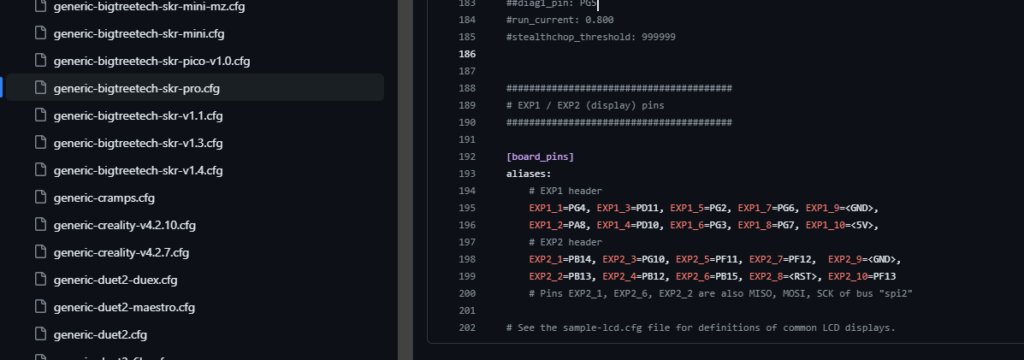
i will copy that at the end of my printer.cfg
After what, i’ll copy display emulation setting (found on github, i use a BTT 3.5 inch touch screen )
https://github.com/bigtreetech/BIGTREETECH-TouchScreenFirmware/pull/1913
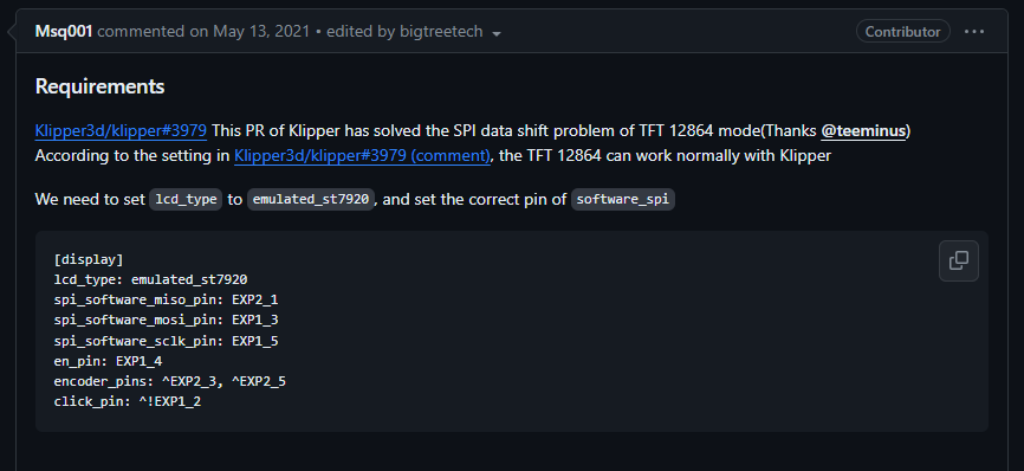
My encoder was reversed, so to fix that i have switched encoder pin definition

Finally i have an old logitech webcam in a drawer and decided to test if it works.
As I have installed crowsnest, It’ll probably be easy
I have plug my camera on my raspberry and check if this one is recognized by it.
‘lsusb’ command in the ssh console does the trick.
No problem, as you can see, on the first line there’s my logitech webcam.
Now, the only thing to do is to add a webcam on fluid UI
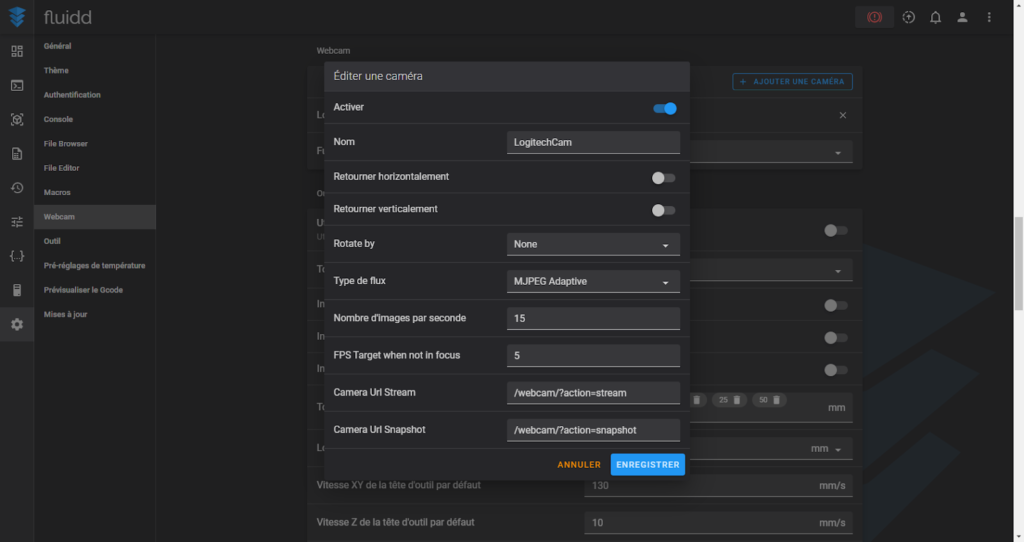
And it works !!!
As far as i know, everything is configured now !
The next part is calibration of all elements. I will do it as follow :
- Height
- Probe
- Delta calibration (with auto calibration)
- Mesh leveling
- Extruder
- First print
- Activation of more feature
- Enhanced delta calibration
→ Height calibration
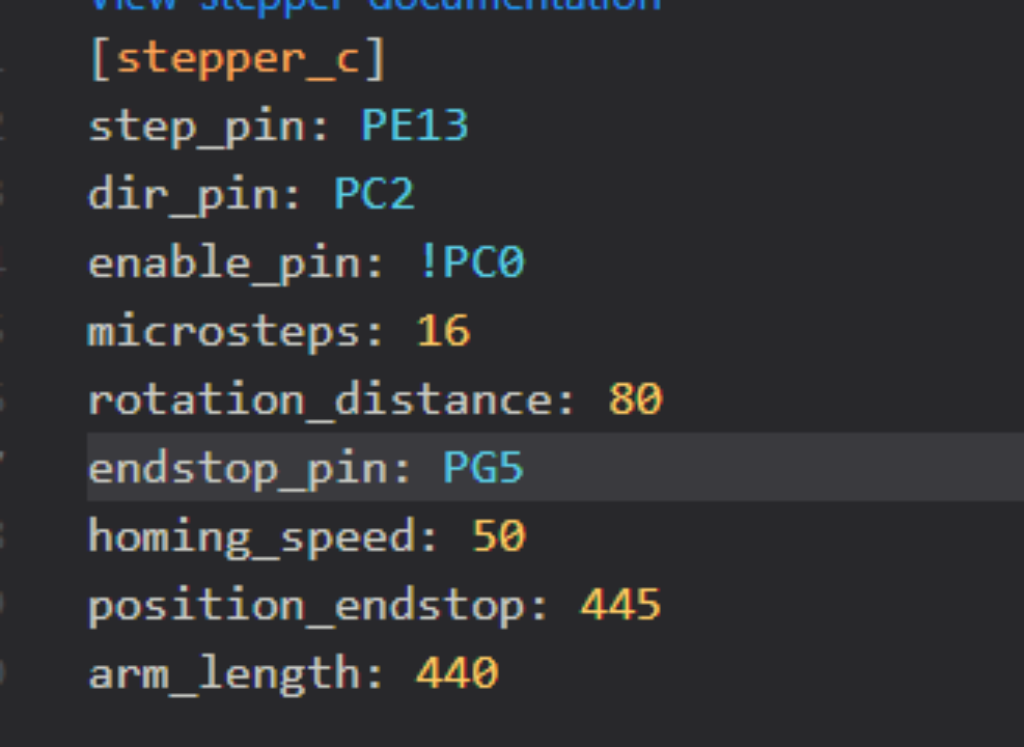
First, I have set position endstop to 445 (endstop on delta are at max height position) but when I ask my printer to go to 0 there is a big gap between nozzle and bed.
I set all the position endstop to 455 and manually move Z height until the nozzle is close enough. so i can calculate the real height.
After manually moving the nozzle close to bed, the remaining height is 0.4mm
Height of my printer is 455 – 0.4 = 454.6mm !
I can now update the position_endstop value in printer.cfg (stepper_a, stepper_b and stepper_c)
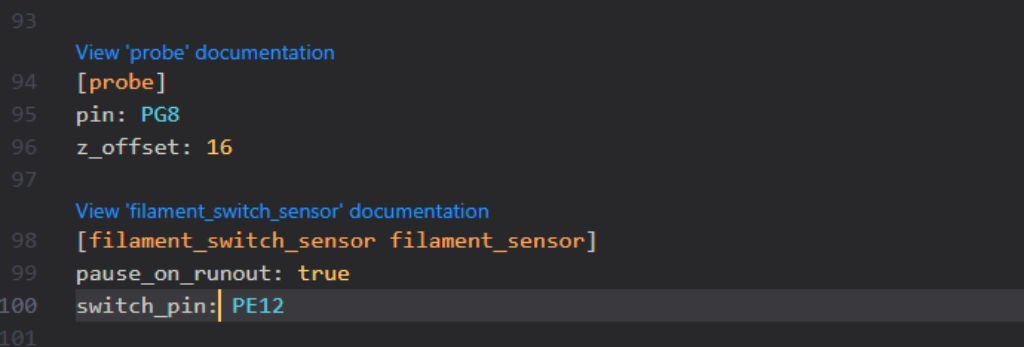
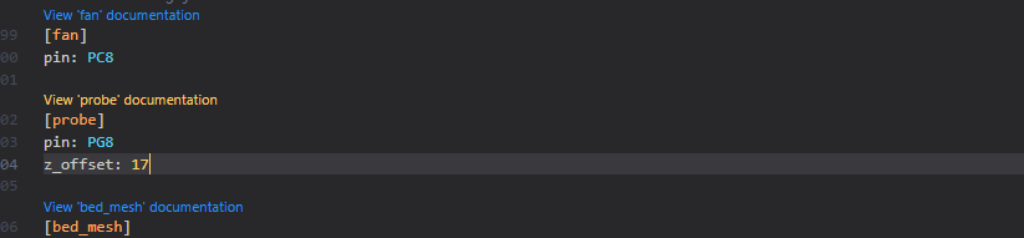
→ Probe
To determine the Probe z offset, first home all axes with G28 command and then execute the probe command.
Klipper will give the result in the console.
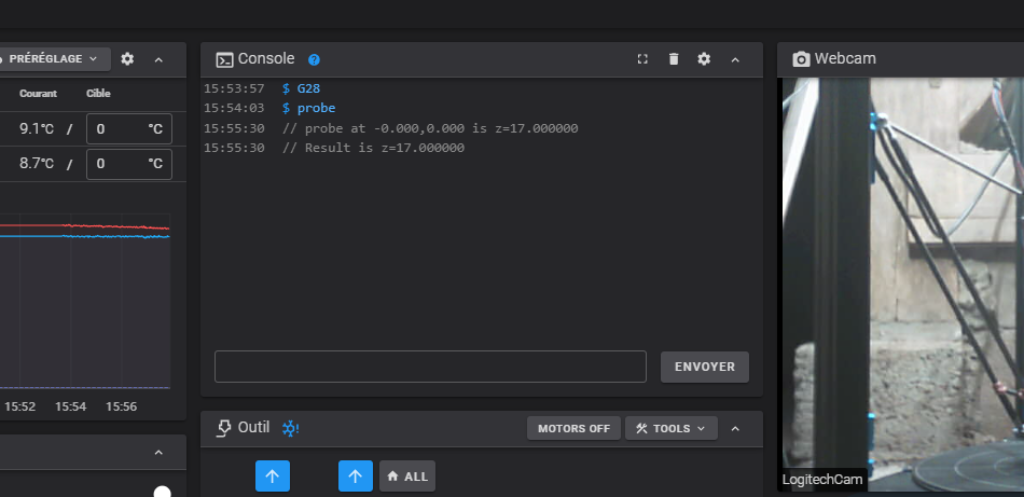
Here is 17, so i will update the z_offset value in probe section of printer.cfg
Now i will do an accuracy check with the PROBE_ACCURACY command.
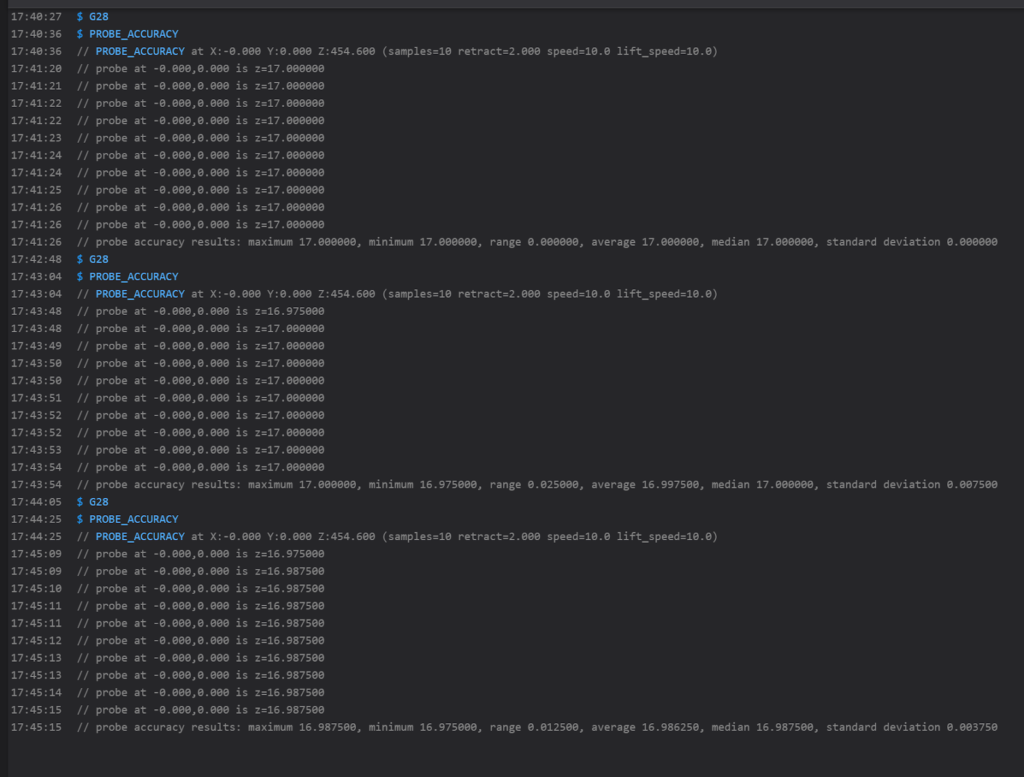
I have done it 3 times, and it seems that the probe is really accurate (less than 0.01)
the maximum reported is around 7,5 micron
→ Delta calibration
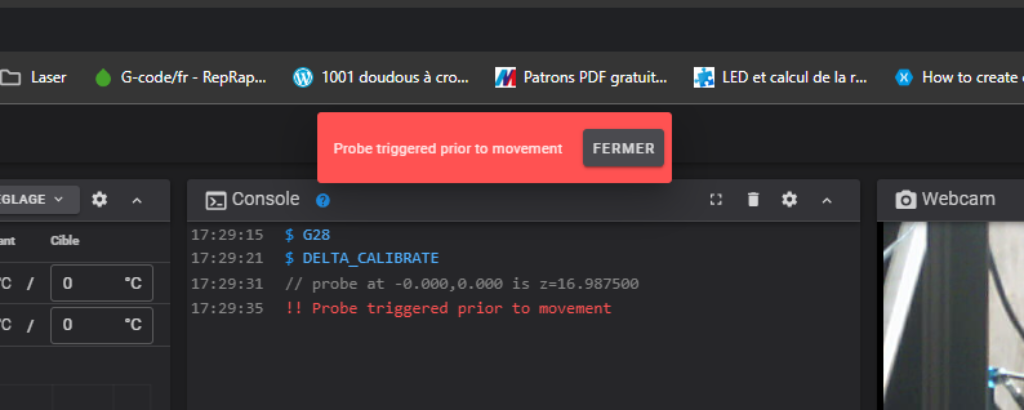
For delta calibration, Klipper have an embedded command called DELTA_CALIBRATE.
I launch this command on console and this happen
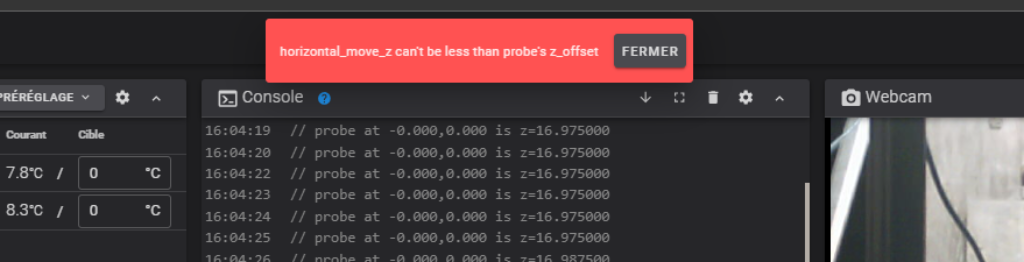
This mean there’s an error in my printer.cfg file in delta_calibrate section
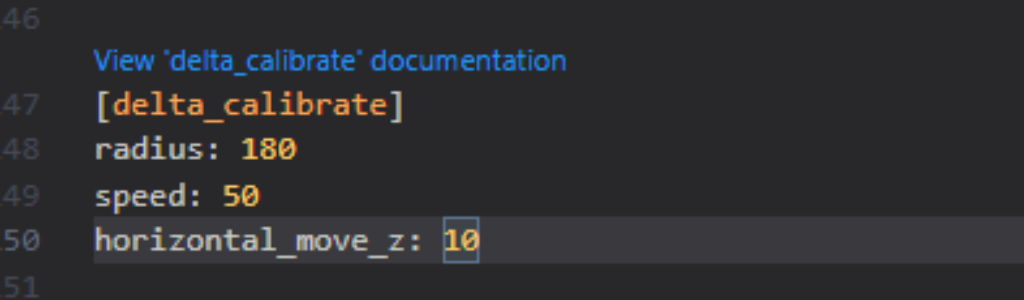
As you can see my value is less than probe offset. So i set it to 20 and relaunch the command
Second issues appeared :
So i’ll go deeper in Klipper configuration about probe section
https://www.klipper3d.org/Config_Reference.html#probe
after what i decide to update this section with more parameters
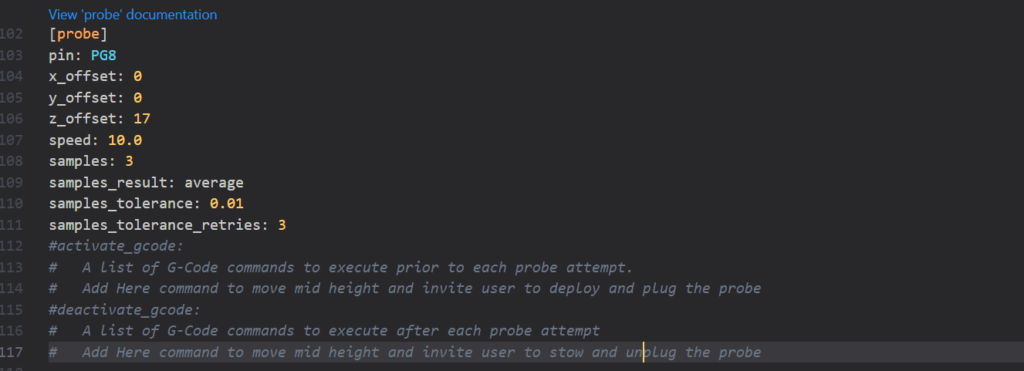
and tell the printer to go a little more up when probing

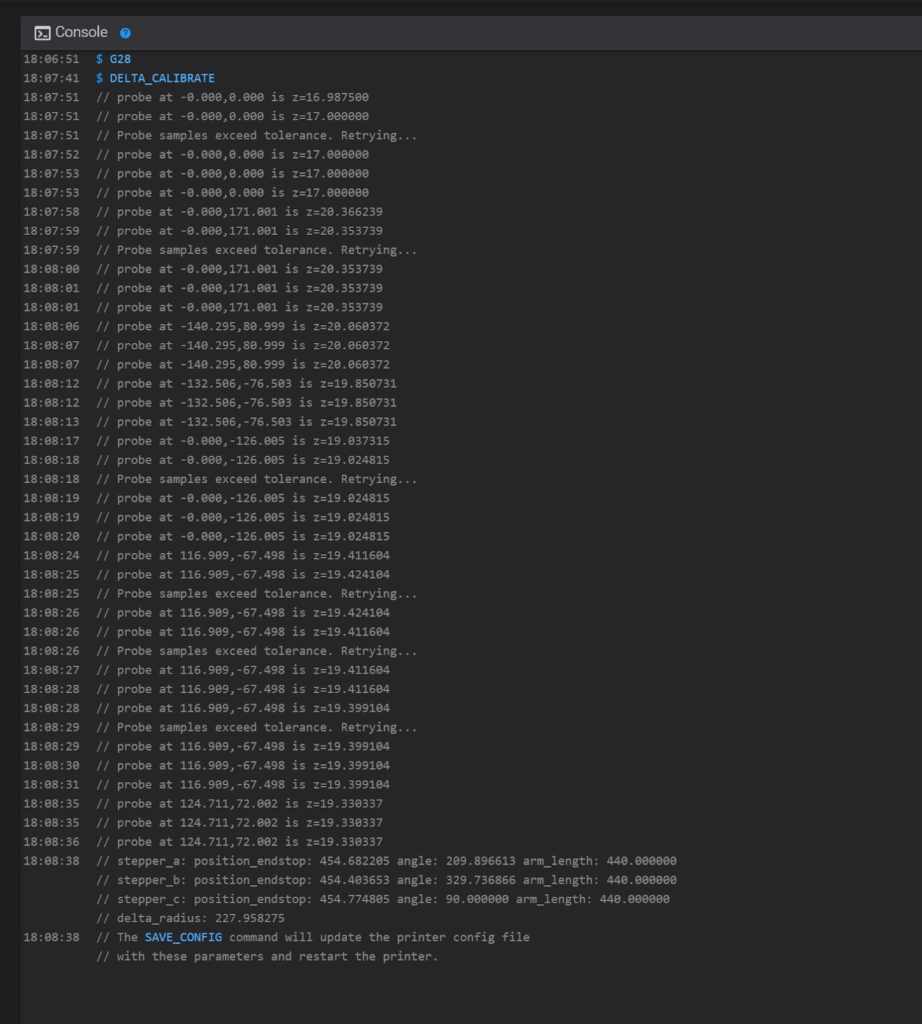
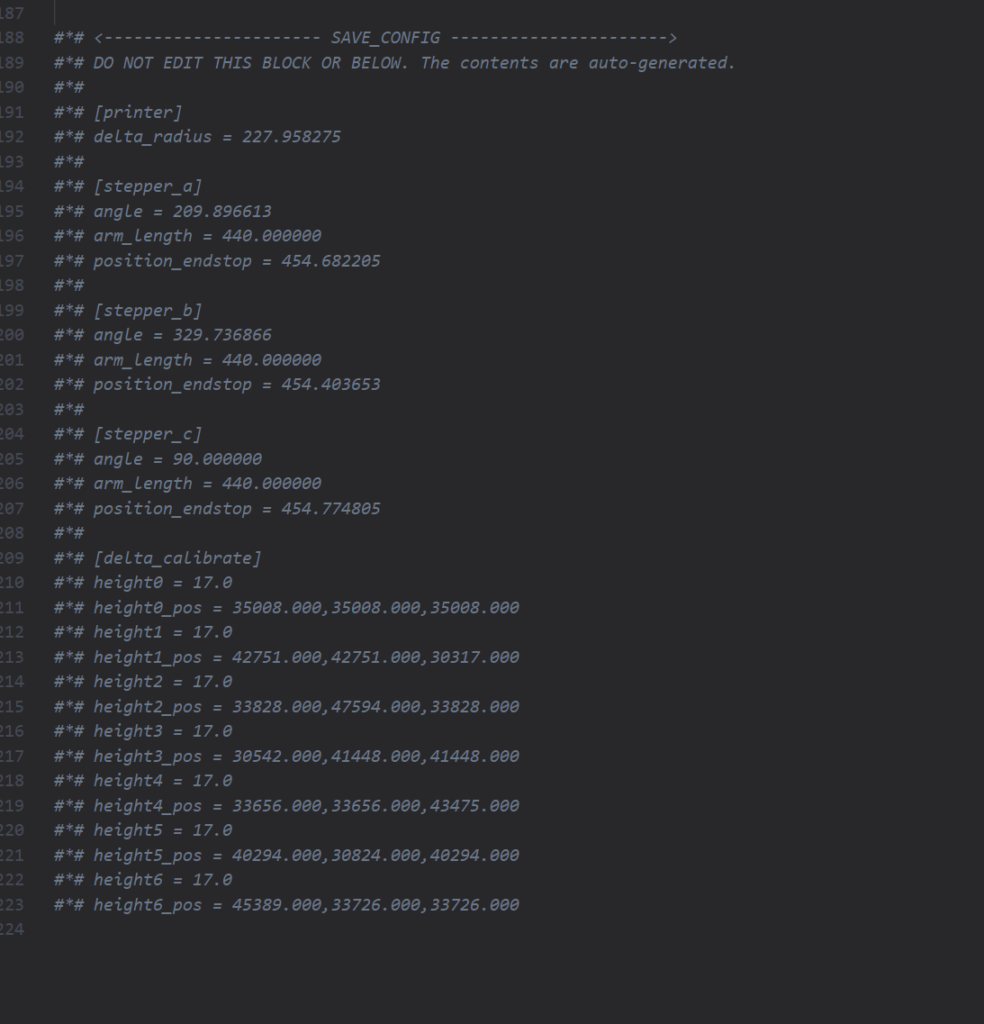
Save and restart, re launch delta calibrate command and finally :
Before saving configuration done by autocalibration, i’ll save the initial configuration i’ve just done
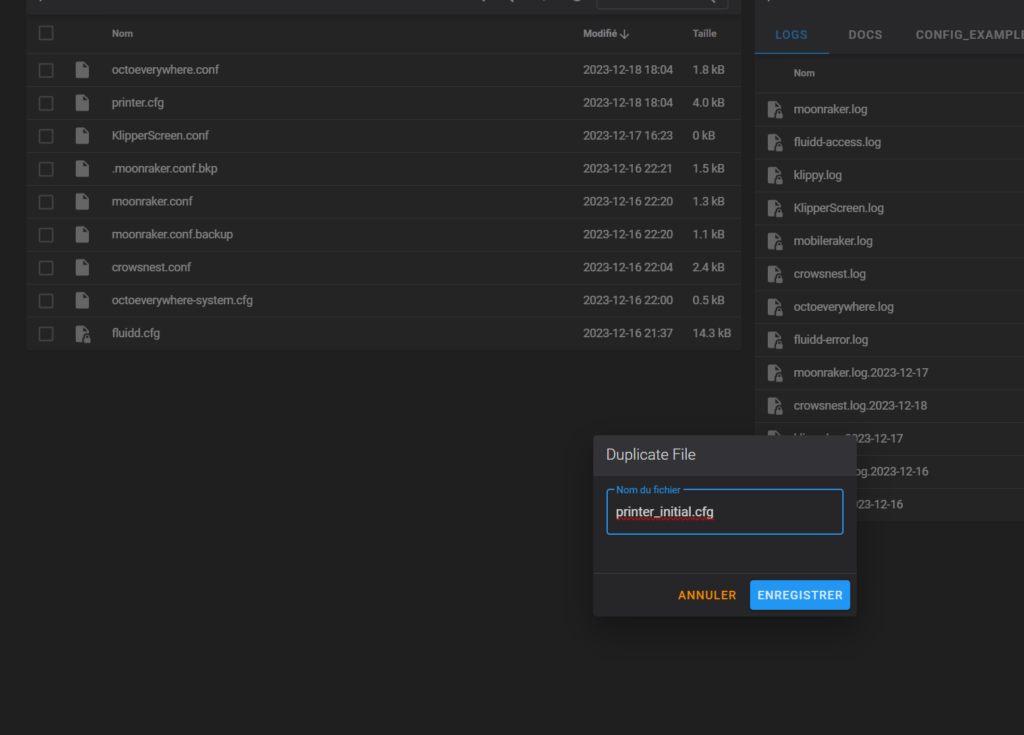
and then run the save_config command.
if we take a look in the auto saved printer.cfg, first in all stepper section, position_endstop and arm_length are commented
in printer section the delta_radius is also commented
and a new block have been added at the end of file with all the measured and calculated values
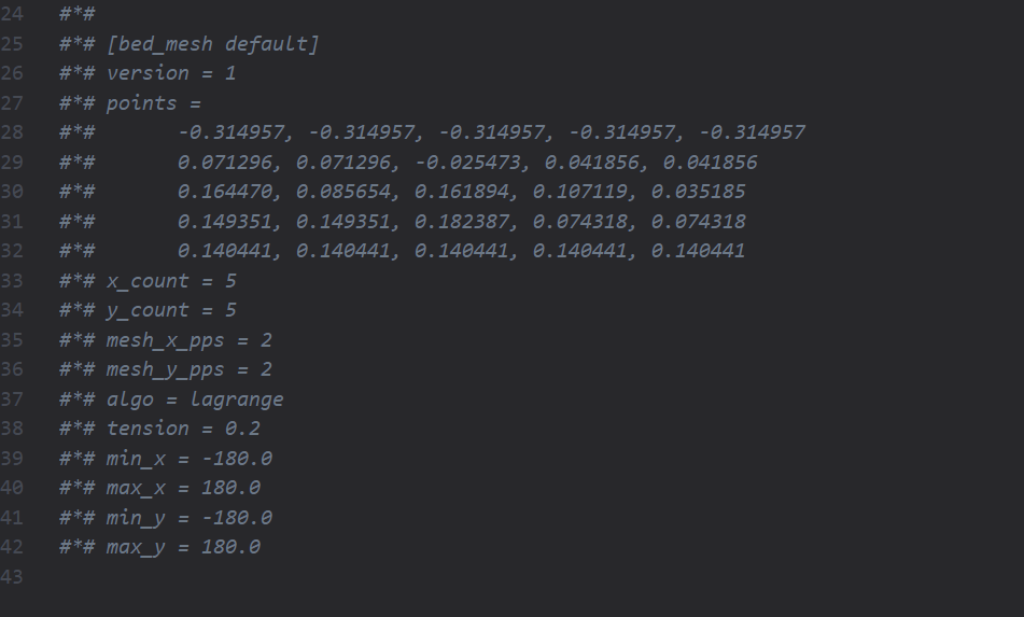
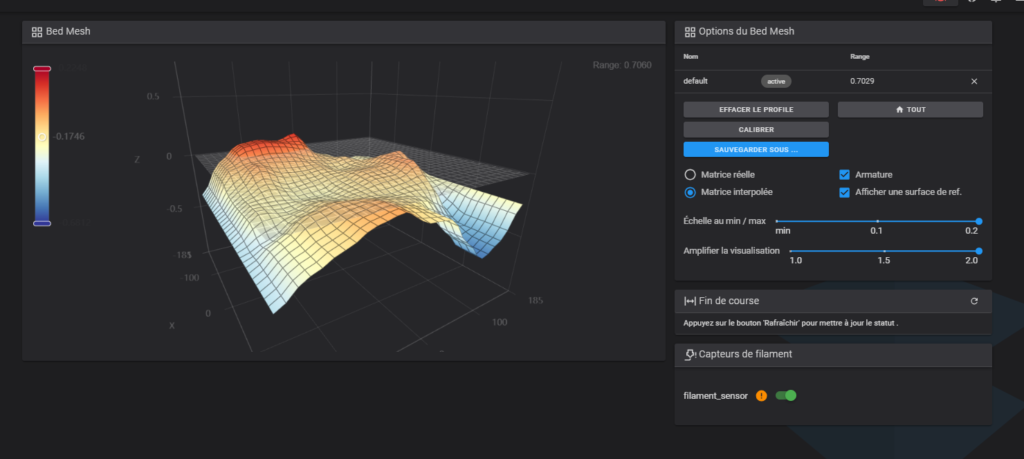
→ Mesh leveling
To launch bed meshing, just enter the BED_MESH_CALIBRATE command in fluidd console.
When done you will see a bed mesh in fluidd UI
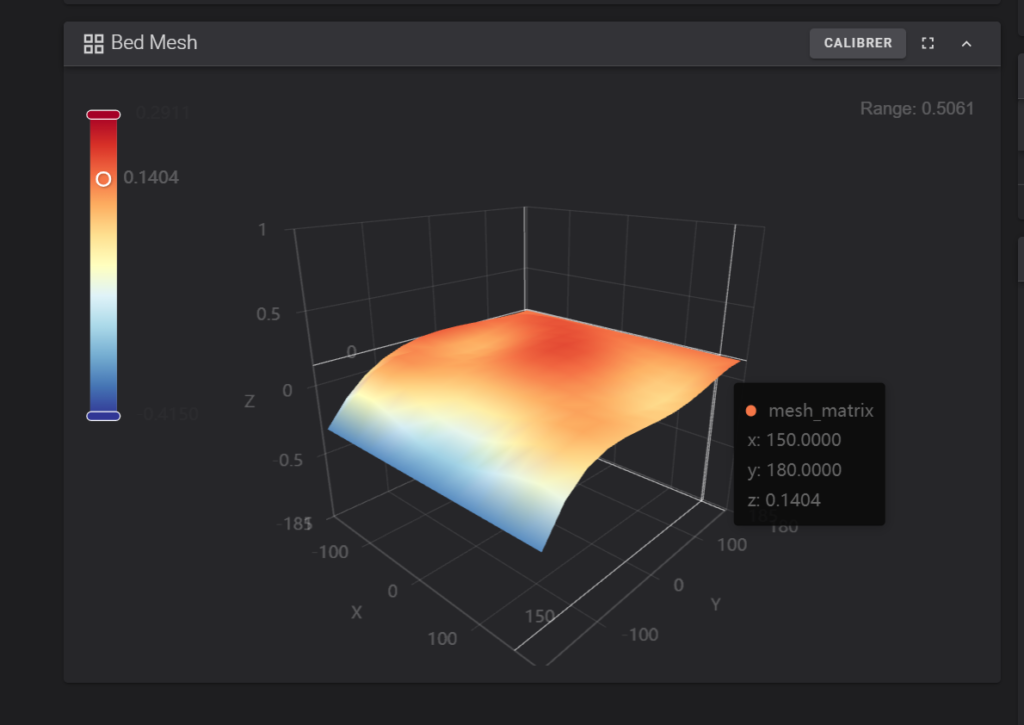
After running the save_config command, mesh leveling values are stored to printer.cfg file.
This bed_mesh profile is called default. If you read the Klipper documentation, you will learn that you can have a lot of bed_mesh profile
→ Extruder calibration
I first checked that the direction of the extruder was correct. Mine is reversed, so the first change for me is to set the right direction.
For that i have to reverse the dir_pin in extruder section of printer.cfg file
Was initially set to PA0 and now is !PA0 (the ! symbol invert logic of pin)
Second point is to determine the rotation distance. In my marlin configuration, step per minimeter was 420.
With the formula my rotation distance is :
rotation_distance = <full_steps_per_rotation> * <microsteps> / <steps_per_mm>
200 * 16 / 420 => 7.619
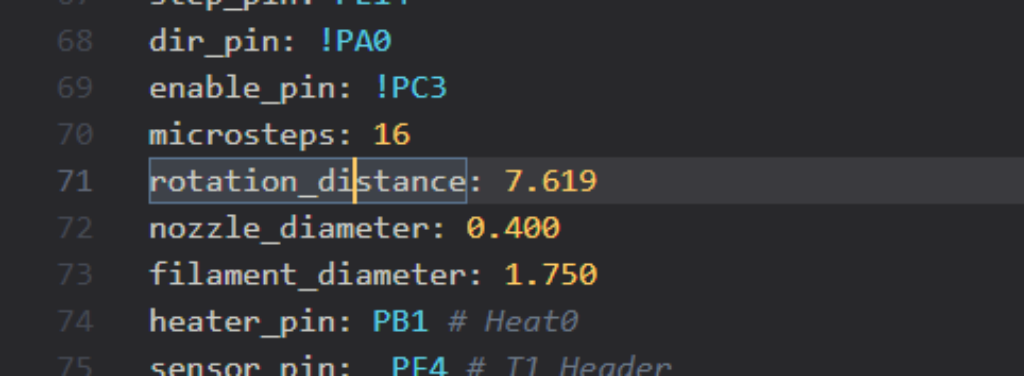
Save and restart and now properly done the calibration.
For that I refer to Klipper documentation
https://www.klipper3d.org/Rotation_Distance.html#calibrating-rotation_distance-on-extruders
and to this great tutorial :
https://ellis3dp.com/Print-Tuning-Guide/articles/extruder_calibration.html
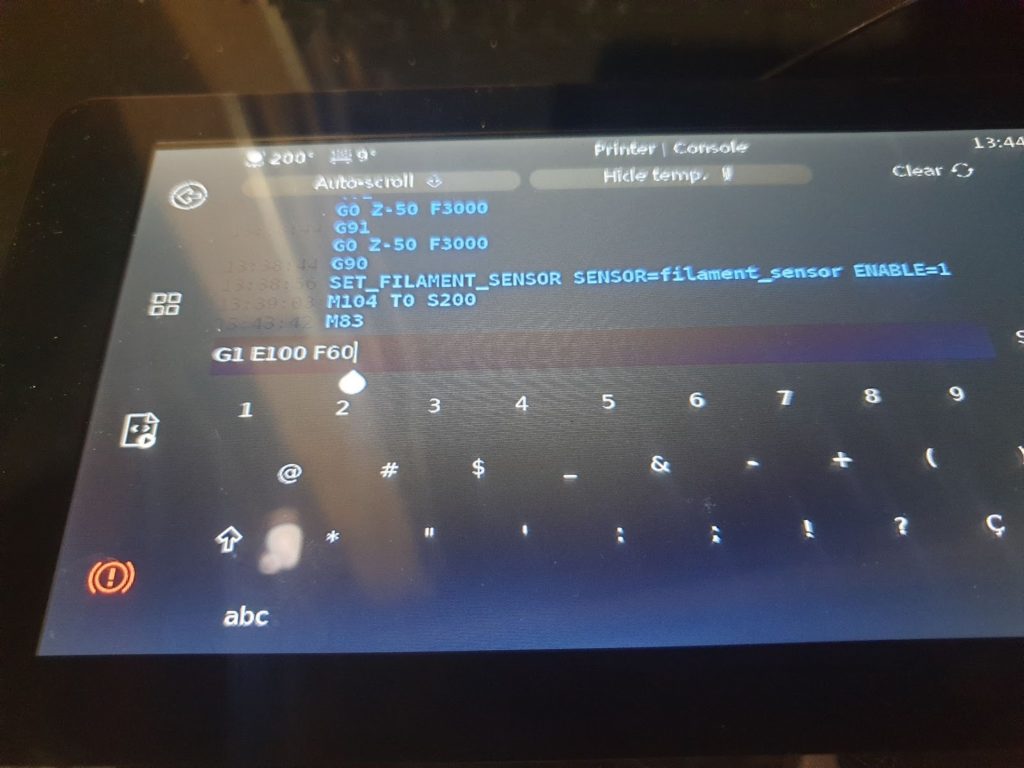
so, I have placed a mark at 12 centimeters above the extruder
Unplugged the capricorn from the hotend
And then send command to extrude 100mm at 60mm/s
And Nope ! another error.
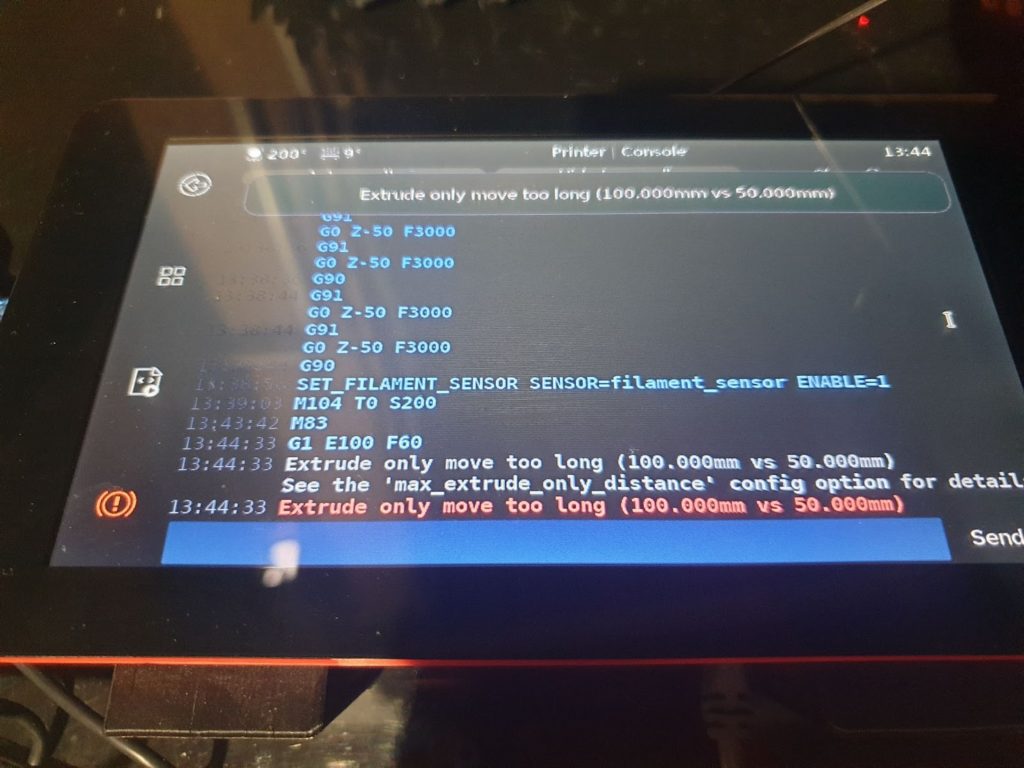
This means I have another time missed something into the configuration.
Go to extruder section in Klipper documentation and this parameter have a default value to 50mm if not set
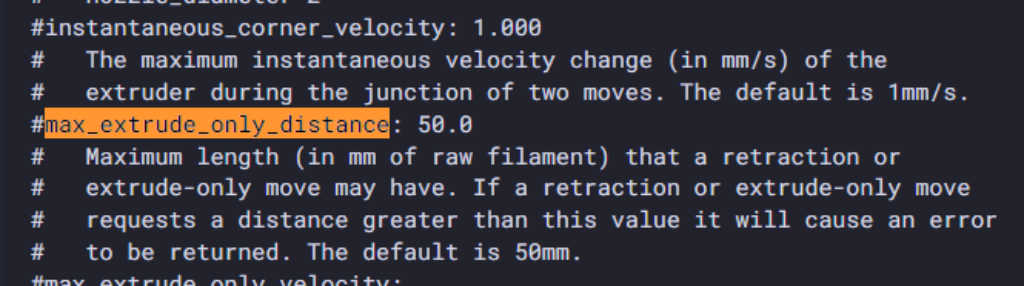
So i set this parameter to 200 in my printer.cfg file
Save and restart and then redo the operation.
After doing the operation, I measured the remaining filament.
I measure 18mm instead of 20mm. My extruder is over extruding a little.
I have to correct that by adjusting the rotation distance.
- <new_rotation_distance> = <previous_rotation_distance> * ( <actual_extrude_distance> / 100 )
7.619 * (102/100) = 7.77138 rounded to 7.771
Before continuing, it will be good to run PID calibration of the hotend and hotbed. For that run :
→ PID_CALIBRATE HEATER=extruder TARGET=230
→ PID_CALIBRATE HEATER=heater_bed TARGET=70
then SAVE_CONFIG
→ First print
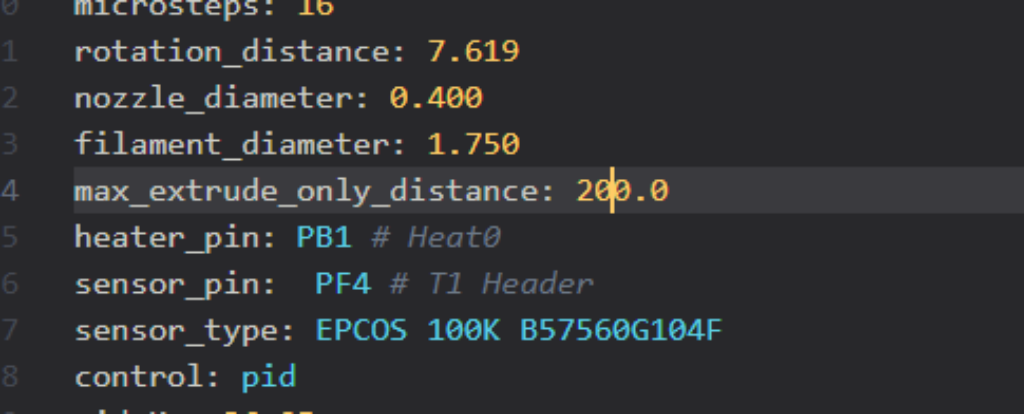
Now it’s time to see this printer in action ! And for that the traditional benchy !
To slice the benchy i have use my favorite slicer, prusaslicer with a profil at 150mm/s
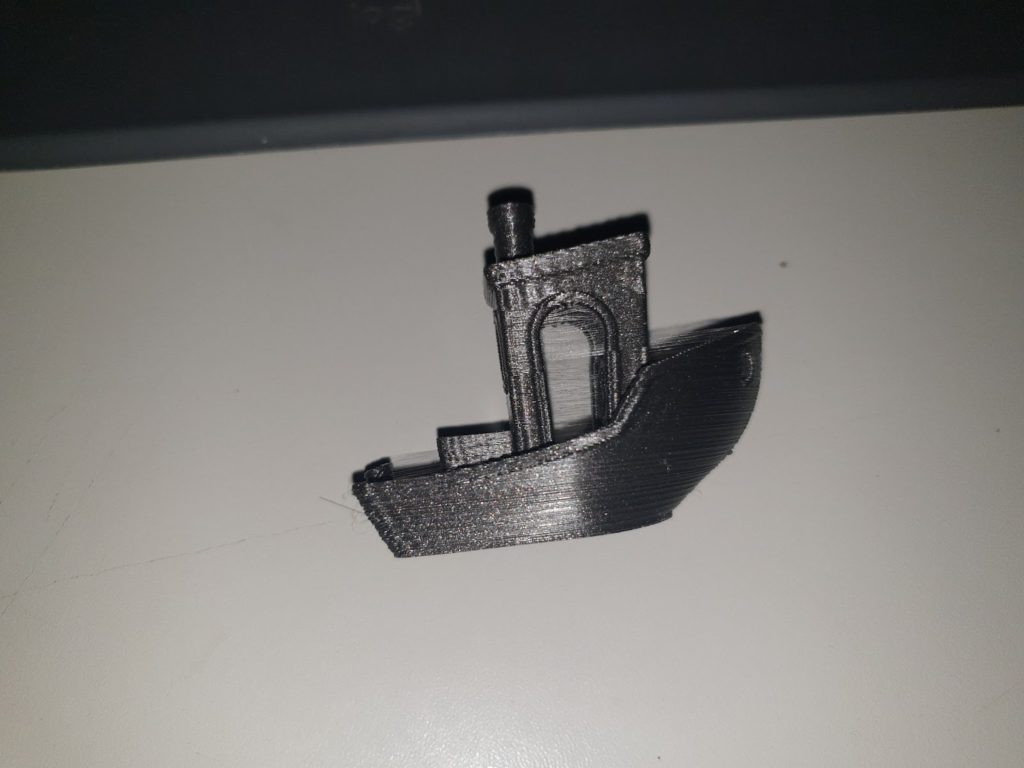
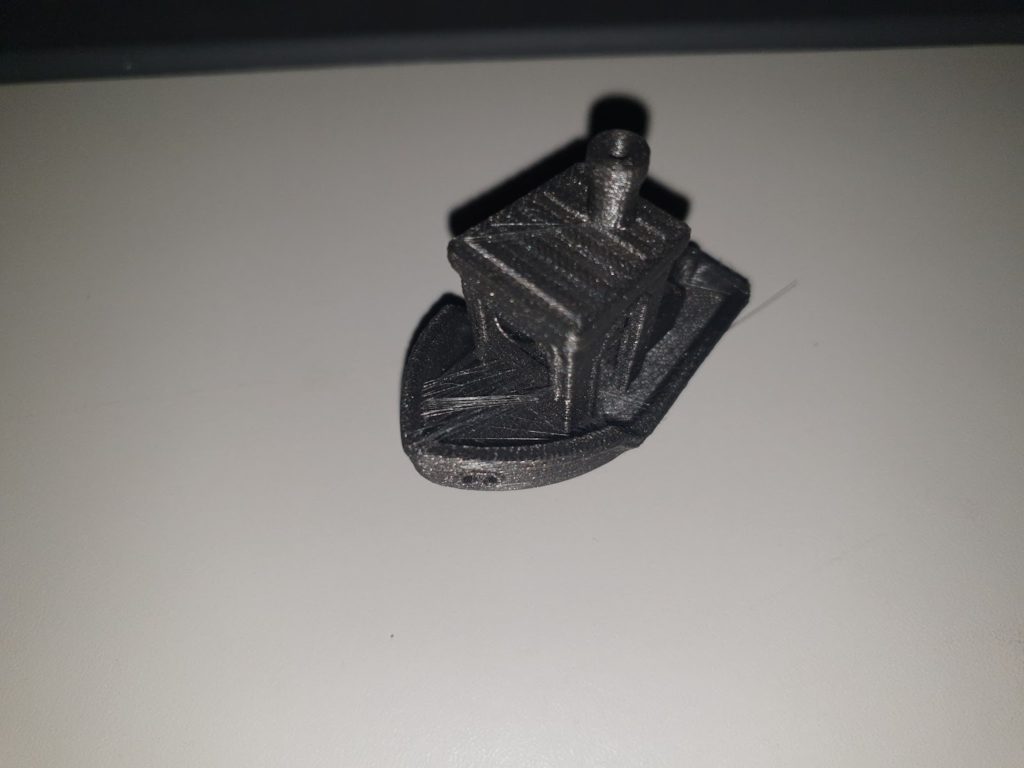
Not to bad for a first print, i’ll have to do more tuning on extruder and hotend to resolve stringing but it’s pretty close to be really good
→ Activate more feature
⇒ Pressure advance
add this line in extruder section of printer.cfg file to activate the feature
pressure_advance: 0.04
pressure_advance_smooth_time: 0.040
⇒ Improve bed mesh leveling

after made this change, do a BED_MESH_CALIBRATE and SAVE_CONFIG when done
⇒ Recall bed mesh after Homing
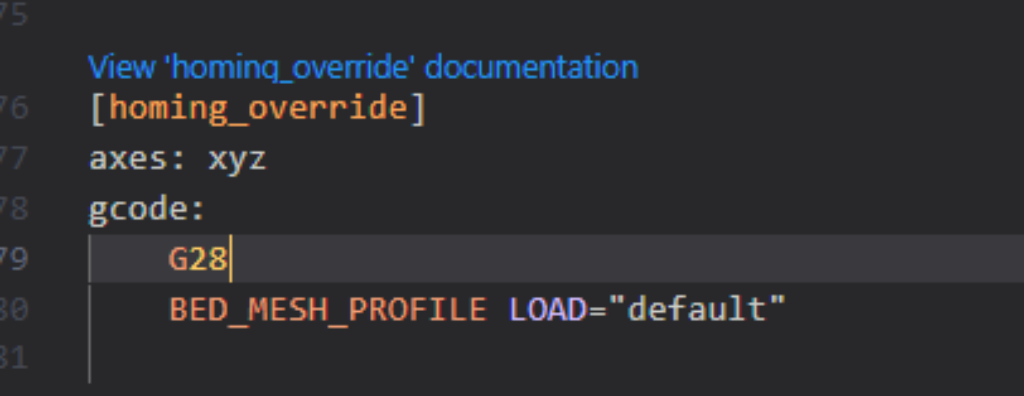
in printer.cfg after delta_calibration add a section homing_override with the following lines
⇒ Timelapse
For timelapse, first go to moonraker timelapse gitbub and follow installation step :
https://github.com/mainsail-crew/moonraker-timelapse/blob/main/docs/installation.md
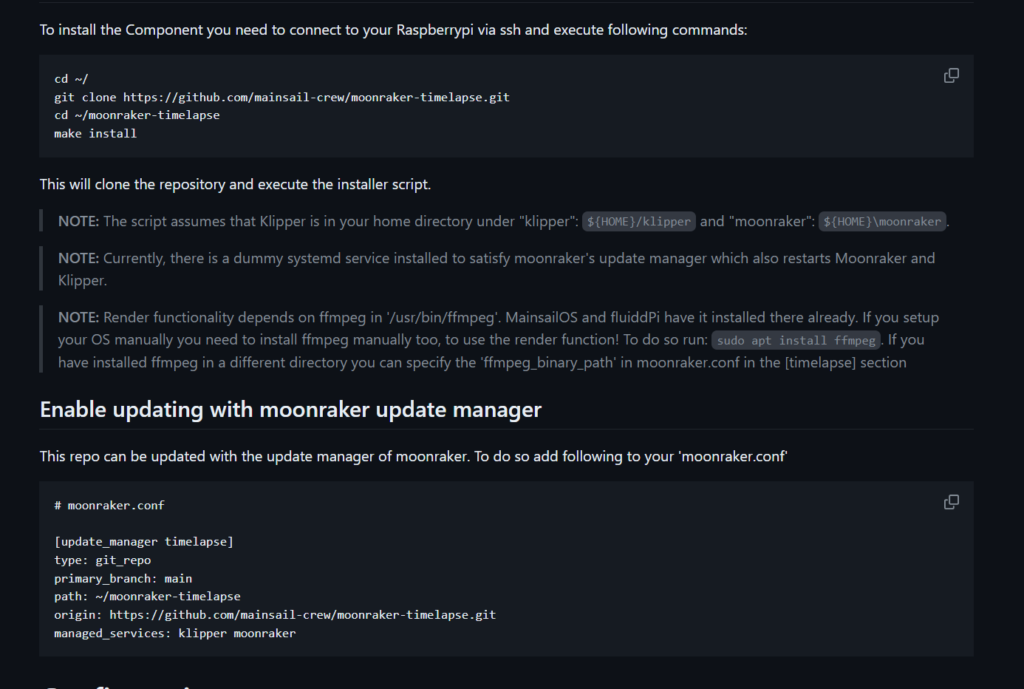
after installation, you need to configure it.
Go to configuration website and follow the guide :
https://github.com/mainsail-crew/moonraker-timelapse/blob/main/docs/configuration.md
Finally for me the lines i have added in moonracker.conf are :
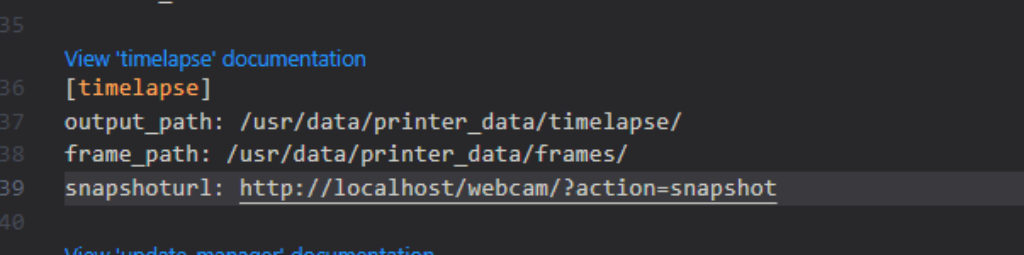
be sure that the directory you entered exists
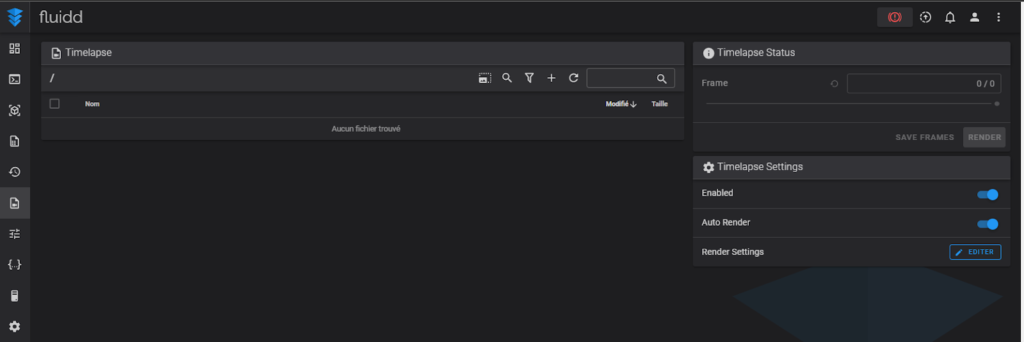
if all configuration is well done, you have now access to timelapse in fluid
⇒ native Klipper features
in printer.cfg file add those lines to enable native Klipper feature. you can read Klipper documentation to know more about each feature
[display_status]
[pause_resume]
[exclude_object]
[respond]
→ Enhanced delta calibration
This is the final part for a perfectly calibrated delta printer.
As all chapter of this tuto, i refert and follow the Klipper documentation.
https://www.klipper3d.org/Delta_Calibrate.html#enhanced-delta-calibration
So i first download the provided stl at :
https://www.klipper3d.org/prints/calibrate_size.stl
as recommended i slice it at low speed (50mm/s) with prusa slicer
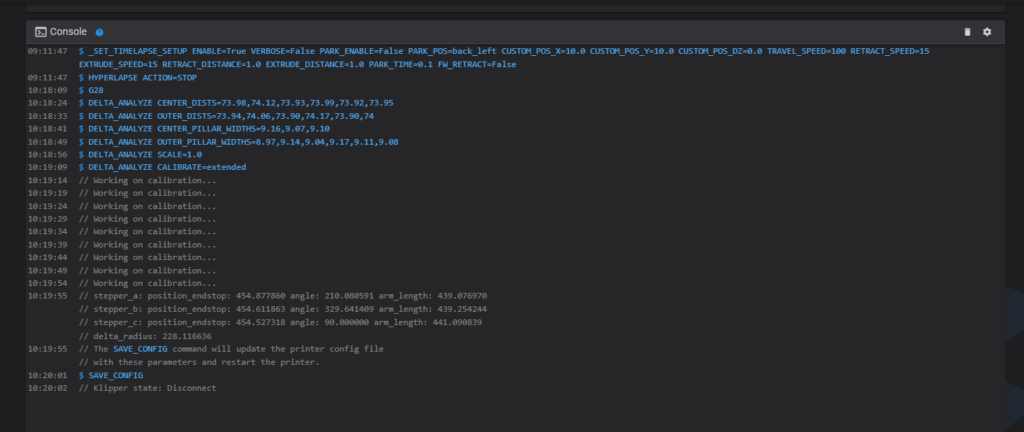
When the model is finished to print, i have taken all the required measurements and make all the necessary commands
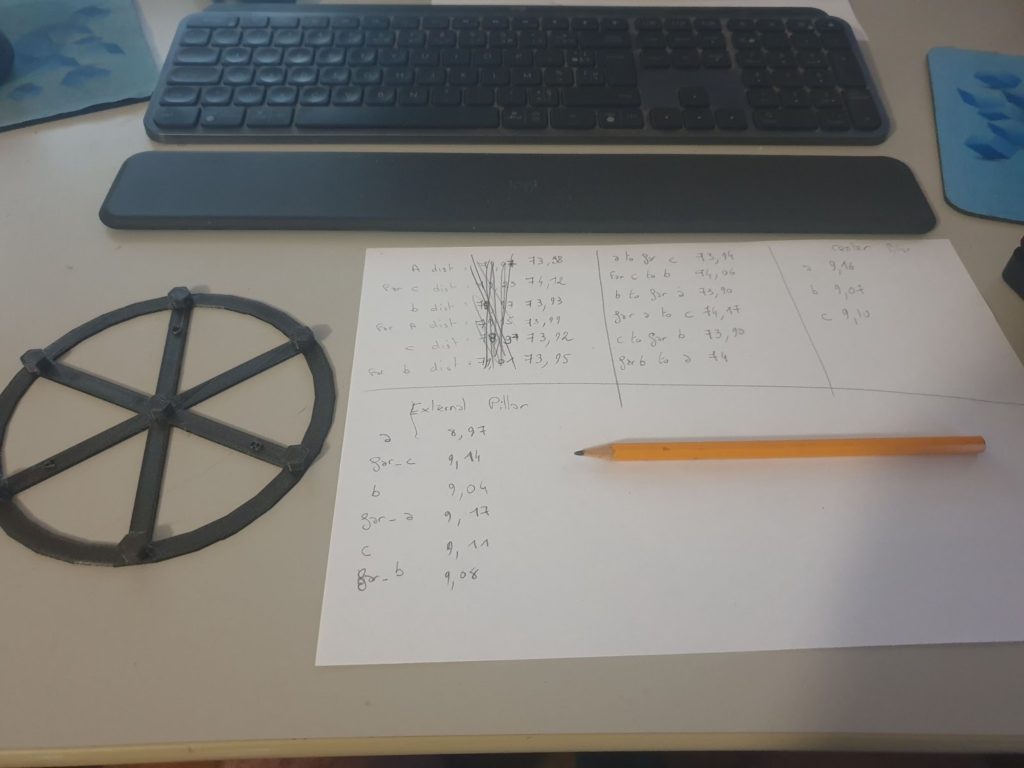
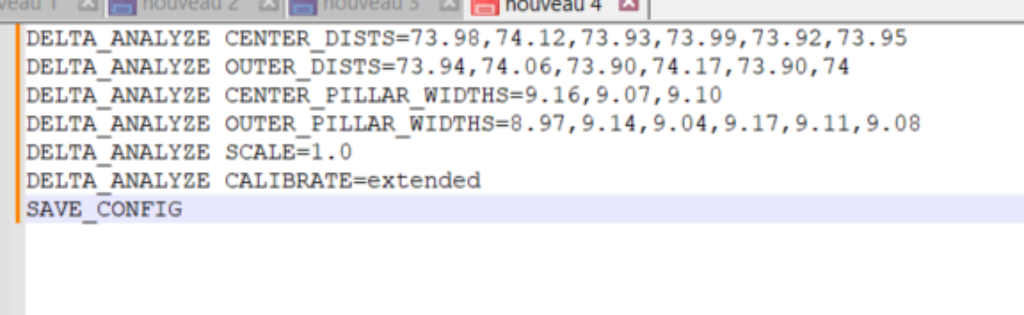
Then i have entered all the command successively in fluid console
And finally, as the Klipper documentation suggests, I will redo a besh_mesh_calibrate.
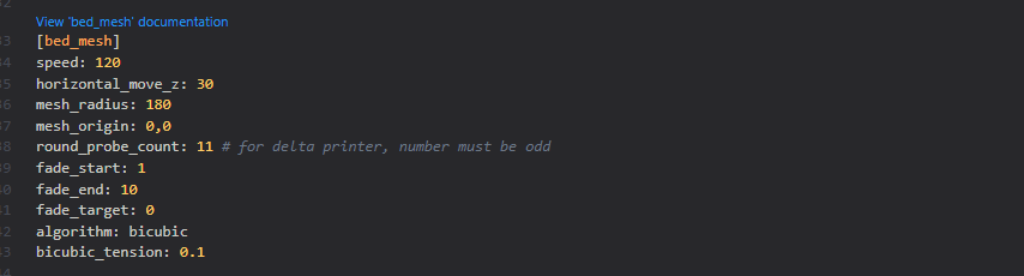
for that i update the bed_mesh section in printer.cfg file
As all we know, heat will play on heatbed flatness (dilatation) so i’ll preheat to 60°C the hotbed before do the bed mesh calibration
Troubleshooting
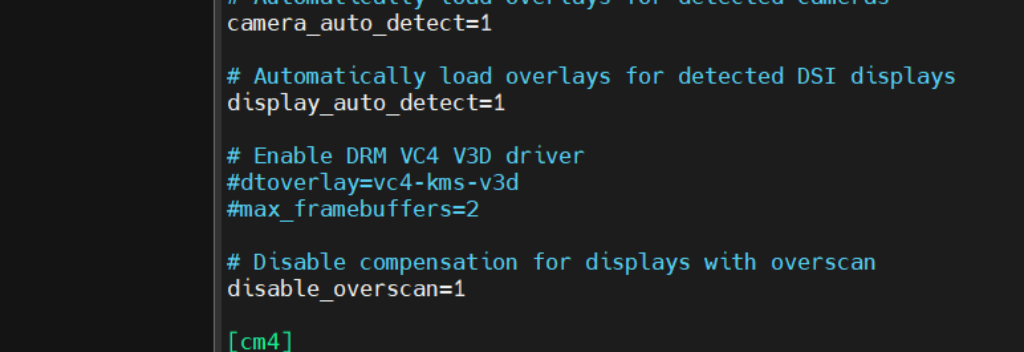
KlipperScreen / TouchScreen not responding
If like me sometime TouchScreen of RPI not responding you must have to make some change to config.txt of Raspberry
for that open an ssh session, go to root folder and then edit file with this command
sudo nano boot/config.txtin the file find the Enable DRM VC4 V3D driver section and comment out the lines
Unknown command G2/G3 :
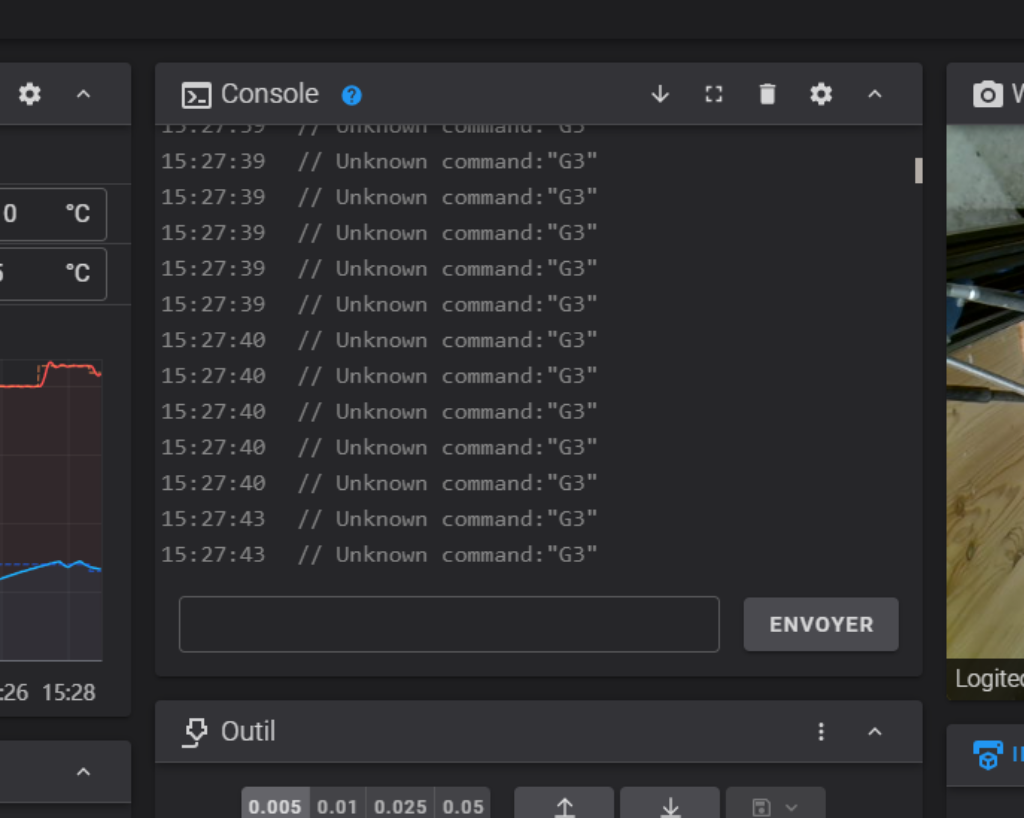
add this line in printer.cfg to enable feature

Conclusion
In conclusion, installing Klipper is not easy when you are new to it. It will take time and needs some knowledge.
But ! What a benefit !
With all brand new printers in the market with Klipper inside, the only thing you hear is Klipper = speed ! But not only !
With Klipper you regain the entire control of your machine and have a wireless connection to it !
For me, mesh leveling is also better than marlin one and finally, with a tiny computer to process gcode, if your printer is properly calibrated, print are so far better
Hope you’ll find this useful !
See you on Nozzler for new tests and tutorials !
De nature curieuse, je suis tombé dans l’impression 3d il y a 6ans. Depuis c’est devenu une passion étendu à la gravure/découpe laser et CNC. Passionné aussi d’informatique et de robotique, les parties firmware et technique des imprimantes 3D n’ont quasiment plus de secret pour moi.